Showing posts with label Paws. Show all posts

Thursday, August 28, 2014

on 13 comments

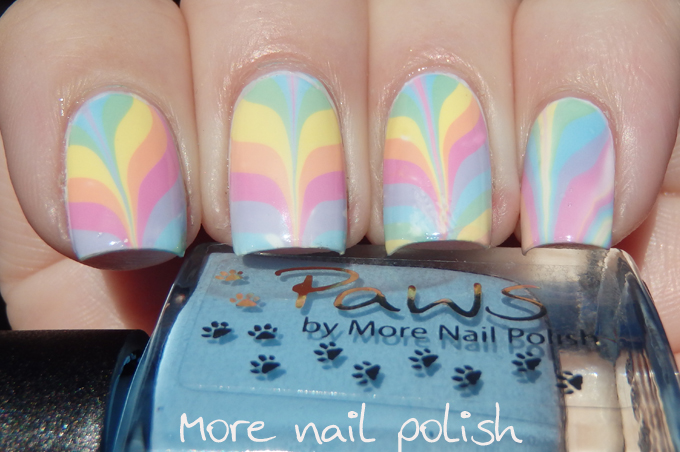
Pastel rainbow water marble with some tips and tricks

Not satisfied with my rainbow bright shades of water marbling polishes, I mixed myself up a collection of pastel water marbling polishes too.

I messed the tip of my ring finger by just being clumsy, and again trying to save time by doing two nails into the bullseye at one time.  That's it, I'm not going to do that again.  I really love these pastel shades, they are all roughly the same tone of colour which makes then such a lovely collection.


Now there are lots and lots of water marbling tutorials and videos out there (trust me, because I've watched and read just about all of them) But here are some additional things I learned that I aren't mentioned very often, and they might help you if you are struggling with water marbling.

The number one issue most people talk about is the polish not spreading.  Yep, this was exactly my issue.  First up, you have to use the right polishes.  That is the most important thing.  The the polishes don't spread you will never get a good bullseye. As I don't have a lot of experience with brands of polish that work well, I suggest you google that one.  One thing I've found is that not all polishes from a particular brand will work. All I can recommend is to try different polishes and brands to see what works for you, also, look at other watermarble nail art and see what polishes they used.

Water at room temperature is important.  It hasn't mattered to me whether is was filtered or not, I just use tap water and ensure its not too hot or cold.

If your first drop doesn't spread in a nice circle (example below), grab a toothpick and run it around the edge of the cup, this makes the polish spread further to the edge.


Don't let that first drop dry out, if it drys out then the second drop will never spread  Make sure there isn't a heater or fan blowing where you are working and drop the first few polishes fast.  I even recommend dropping the first colour 3 times straight after each other.  This makes the first ring thicker and less likely to dry out before switching to your other colours.  


When you start dragging your design, don't touch the three outermost rings.  I used to try to drag from the very outside, and that would end up dragging some dry polish across and ruining the whole thing.  Start three or four rings in and stop three or four rings before the end on the other side (if draging through and not stopping in the middle)


Because I did this bullseye for these photos, I had to put my finger in to see the end result.


I seriously love my Paws water marbling polishes so much!


Between bullseyes, clean the top of your water.  If it's not clean, your first drop will not spread out at all.  Usually the water has lots of very fine bits of polish floating on it from where you cleaned up the top of the water before you took your nail out. 


The way I clean the water is to put a drop of Seche Vite on it.  I then run my toothpick around the edge of the cup until you can see the Seche Vite has spread out totally to the edge.  The Seche Vite will dry fast and look wrinkly on the water, it will also contract inwards pulling the floaties with it.


When you slide the Seche Vite out of the water in one large sheet, it takes all the floaties away.


My cleaned up sample nail.


I hope these tips help you little bit, but if you have any more questions, please ask them below and I will answer them tomorrow night with another water marble post.

Wednesday, August 27, 2014

on 6 comments

Amazeballz marble

Remember my Rainbow marble a few days ago, and how I was all braggy about the fact that I finally cracked the code to water marbling.  Here is another marble that I put together using my awesome custom Paws Polishes for water marbling.

This was a really simple water marble.  I started with a base of Lacquistry Amazeballz Your so extra fine, and then I did a water marble using clear and black polish.  I was dipping two fingers at once into the water, cause I just hate seeing a pattern wasted, but that also means its harder to line up each swirl perfectly.  I wish they were all lined up like my index finger.  Next time I should just do one finger per bullseye and that way I can line it up much better.  Anyway, I'm being a pick picky here, cause seriously - I love this!


Sunday, August 24, 2014

on 8 comments

Rainbow watermarble

I can count on one finger the number of, what I would consider, successful water marbles that I have ever done.  That one successful marble was during the 31 Day Challenge last year for the Water marble theme. That is until this week.  To the water marble gods, I can now happily say 'Bite me', for I do not need to pray to them anymore to get a good water marble!

This past week I have done four different water marble designs, and I have not needed to redo a single nail.  I can't believe it, I finally cracked the water marble code!

So what's the secret you ask? Just like the only other successful water marble I did last year, it's all about the polish. That is it! I am using the exact same technique I've always used, but unless you have the right polishes that spread in the water perfectly then it's not going to work.

I recently was looking at lots of gorgeous marbled designs using Pipe Dream Lacquer.  I very nearly purchased the whole set (except they weren't all available from the only shop I could get buy them from).  Then it got me thinking, what is it about those polishes that makes them work so well for marbling?  I pulled out my polish making supplies and got to work, experimenting with different formulas until I created the perfect polishes for marbling. 

So far I've made about 20 different shades using my water marble formula, a rainbow bright set, a pastel bright set, plus black and clear and a few other shades in between.  I'm obsessed, all I want to do at the moment is create water marbles! Plus I no longer have to worry about filtered room temperature water, I just created these with regular tap water, straight out of the tap!

So here is my first attempt at a rainbow water marble using my Paws polishes water marble formula.


Edited to add the quick Instavideo.
I'll show you the other water marbles throughout this week, in the lead up to the 31 day challenge starting on September 1.

Friday, October 18, 2013

on 14 comments

Green reverse stamping

Nail art instead of swatches tonight. But I'll be back to swatches tomorrow.

I've been playing around a bit more with the reverse stamping technique where you: 
  • stamp onto plastic, 
  • colour it in with polish, 
  • apply top coat, 
  • let it dry, 
  • peel it off and 
  • then apply it on top of some tacky polish on your nail. 
I stamped with Winstonia plate W111 in black. I used my custom Paws polish clover green and added white to get the four shades.  I just mixed the colours on a palette and used a nail art brush to fill in the stamp I did a gradient using the same Paws clover green and white and applied Penelope Luz Dark Angel black glitter over the top.  I loved how the whole design came together.


Did you notice that I totally cheated on my right hand and just stamped the black directly onto the green polish.  It just doesn't have the same depth or interest does it!

Wednesday, October 9, 2013

on 4 comments

Wave of Polish Auctions

Did any of you notice my whoopsie posting of these images yesterday? I'm blaming the cat who walked across my lap and the keyboard and accidentally pressed 'publish'.

Today I'd like to let you all know about a little project that fellow Aussie nail blogger - Theresa from It's all about the polish has been working on.

October is International Pregnancy and Infant Loss Awareness Month. Throughout the month she is asking that we paint our nails blue and pink on a Tuesday to show our support and raise awareness of pregnancy and Infant loss. 

In conjunction with the wave of polish campaign she is holding multiple auctions of one-off polishes. The money she raises will be donated to Sands Australia. Sands promotes awareness, parent support and understanding following the death of a baby. 

There are 32 lots of polishes being auctioned. Some are Australian indies and some international indies and there are also some gorgeous pastels from amazing Australian polish brands and other etailers.

Some of you may know that I have my own little brand of polishes called Paws. I don't sell my polishes. Instead I provide them to friends and family and as special extras when I do swaps or gifts.  They are pretty rare and only owned by a chosen few.  I was delighted when Theresa contacted me and asked if I would like to donate a polish to her auction.  How could I say no? In fact I couldn't just do one polish, I had to do a duo.

I wasn't sure that anyone would actually purchase my polishes, but any amount she gets for them will wonderful, because it all adds up.


I created two polishes, a pink and and blue and I made up two bottles of each shade. One for me to swatch and keep and the other untouched to auction off.   Let me show you my polish duo called "Always and Forever"


Always - a pale dusty pink with a multicoloured shimmer. This shade is pale pink indoors and changes colour in the sun to a pink toned purple.  I'm wearing two coats plus Seche Vite in my photos, which are taken in natural light beneath a UV shade cloth


Always - Here it is in the sun.  You can see the multicoloured shimmer better and also the light purple shade it transitions to.


Forever - a dusty pale blue with a multicoloured shimmer.  This shade is pale blue indoors and changes colour in the sun to a blue toned purple.  I'm wearing two coats plus Seche Vite in my photos, which are taken in natural light beneath a UV shade cloth


Forever - Here it is in the sun. Again, you can see the multicoloured shimmer better and also the light purple shade it transitions to.


Here is a side by side comparison of the two shades, first indoors...


...and in the sun. 


Can you check out all the auctions, current highest bids and details on how to bid for polishes on the Wave of Polish blog site

Here is a direct link to my Paws auction page. International bidders are welcome and I will be posting the polishes directly to the winning bidder.  I'd also be delighted to do "twin-nails" with the winning bidder should they wish to do so. And I might just throw in a bottle of my Picture Polish Collaboration Shade "Kryptonite" too.

Wednesday, May 8, 2013

on 27 comments

Paws by More Nail Polish

Firstly - to make it very clear at the beginning - I am not another blogger that has decided to start their own indie line! I've said all along, I just don't have time to do that. Work, husband, 2 kids and blog is enough for me.

So what are these you ask?  Just like I've been doing for several years, these are some custom polishes (or frankens if you want to call them that, but I prefer custom, as they are all made from scratch without mixing in other polishes). I decided I wanted my custom polishes to look pretty because of the effort I put into them.  Paws polishes will not be available for purchase, but I may provide them to friends in swaps or RAOKs.

I've decided to call my 'brand' Paws.  I'm a huge cat lover, and have five little purry paws ourselves, plus my original blogger ID and an ID I use on most online groups is 'kitties26'.  Plus, we are painting our nails after all, which are our human equivalent of paws and claws :)

Today I'm showing you four new polishes I created, and I have to say I've been ever so lazy with regards to the pigments I've used in these.  You see I purchased these pigments nearly two years ago, I mixed a bit of pigment up at the time to test for color solvency etc, but other than that, they sat there neglected for nearly two years.

You may have seen some indie brands coming out with various colour changing polishes recently.  Well today I'm sharing with you my colour changing polishes and at the end of the post will share where you can buy the pigments to make your own.  

Three of these are thermal polishes which change with temperature, I'm super happy with them and love them all.  The remaining one is a solar polish that changes in the sun. I'm not at all happy with it, and I'll share why, but I thought I would show you that fail too.  Shall we get started?

Sylvan - this one is a light silvery blue polish with a scattered holo effect which changes at 86°F (30°C) to a teal blue.  The colour change isn't too strong on this one, but it can still be seen on my very shorty nails here.


Here I have two cold fingers (darker blue) and two warm fingers (light blue/silver)


This one was after I was wearing the polish for a while.  As you can see the tips were an obvious different colour (and they matched my pajama pants perfectly)


Smite - This one is a bright pink magenta jelly.  This is the same pigment as I used above, but just in a different colour and without the holo pigment added.  For this mani I decided to try something different.  I painted a black base and then stamped in white using a dotted bubble pattern.  On top of that I applied  Paws Smite.  At warm temperatures above 86°F (30°C) the polish is basically clear.  In these photo I have two coats of Smite on over my stamping.


When cold, it turns to a dark magenta jelly.


Here it is in transition from cold getting warmer... 


... and warmer.


You get the idea now right?


OK, so here are the pigments I used for these. There are 24 colours, and I clearly have only used two in the two polishes above.  I used the Teal Blue in Sylvan and Magenta in Smite.  All of these pigments change to a white powder 86°F (30°C), which when suspended in nail polish is basically clear.


Icky Pink - Moving on to my fail polish now and I'll share how this ended up being a fail.  This one is a solar changing polish which means it changes colour in the sun. There are six pigments in this range to choose from.  I was sitting there at night playing with pigments and suspension base and I grabbed all six solar pigments.  

In their 'indoor' form, they are all white powders.  I wanted to see what the pigments would look like in the sun, so I put them all under my UV nail lamp.  Four of them changed colour, but two didn't. I assumed this was just because they had been sitting there for two years and had gone 'off'. The other thing I noticed was that the pigment labelled 'green' turned blue, and the one labelled 'blue' turned green.  I figured the labels must have been mixed up.

I continued with my little creation.  My plan was to use the blue solar changing pigment, mixed with a pink glass fleck pigment and a drop of pink polish tint.  Then indoors, it would be a very soft pink, and in the sun it would blurple with a pink shimmer.  Mix and swatch, all looking good at 11pm at night.

The next day when I went to swatch and photograph my polishes, I was hugely disappointed.  First pic is indoors, next two pics are in the sun.


So what went wrong?  Well you see, it turns out the pigments were labelled correctly, and that putting them under my UV lamp showed totally incorrect colours compared to when the were in the sun.  Instead of using the blue pigment, I had used the green. Pink + green = brown.  I created an icky pink to brown polish.  I do plan to make this again correctly with the blue pigment, and I will share that when I do.

Here are the solar pigments indoors, and then in the sun.


Hydrangea - My last polish tonight is another polish that changes with temperature, but this one changes from one colour to another, unlike the first lot of pigments that go from colour to a white power /clear polish.

Hydrangea is generally a cornflower blue shade on my nails most of the time.  It also has a scattered holo effect.  The cold colour that appears at temps below 86°F (30°C) is purple (like the bottle shows)


There are four pigments in this range.  Purple to blue (which I used above), purple to red, green to yellow and orange to yellow.


All these pigments can be purchased from Solarcolourdust.com. I bought mine nearly two years ago, but it looks like they still have the same sets.  They also have some cool looking Glow dust, if you want to create glow in the dark polishes, magnetic pigments and chameleon pigments.

I'm thinking we will be seeing a lot more colour changing polishes available soon.

Thanks for sticking around to the end of this post to read about me playing with Paws.

About Me

My photo
I live in Canberra, Australia with my husband, Mr Ten and Miss Eight. My blog is all about nail polish, and a few other bits in between. You can contact me at morenailpolish@iinet.net.au