Showing posts with label Temporary Tattoo Paper. Show all posts

Sunday, March 23, 2014

on 4 comments

Major League Baseball in Oz

Sorry if you missed me last night, especially after clicking over into my fifth bogging year.  Our little family had a quick round trip up to Sydney over the weekend.  The main reason was to attend the Major League Baseball Opening Series between the LA Dodgers and the Arizona Diamond Backs.  We went to the Saturday night game and the atmosphere was fantastic. 

Naturally I had to do up some fancy nails for the occasion.  The easiest way for me to get a neat look in a quick timeframe was to print out some temporary tattoos with the designs I wanted. I did the MLB logo on my thumb, a little Sydney landscape and text for my index finger, the Dodgers logo on my middle finger, the Dbacks logo on my ring finger and some baseballs on my pinky.  Quick and easy. The woman sitting next to me at the game even noticed my nails, although she seemed shocked and confused when I said they weren't acrylics, but my own nails - and that I did them myself!


Miss Three wont remember much of it as she fell asleep in about the third inning, but Mr five had an amazing time.  We somehow managed to score some awesome seats that didn't didn't cost and arm and a leg (they only cost an arm!) We were sitting in the beautiful members stand at the SCG and had access to all the members stand facilities - which was totally awesome and unexpected. 

We were in row F, which we assumed would be seven rows back.  But it turns out someone didn't pass kindergarten, because row F was only two rows from the edge of the field!  It was also the spot were all the press were, so it was fun watching all the TV action going on in front of us as well as seeing it projected up on the big screen. 

My hubby was also glad to be able to catchup with one of the Diamond Back coaches who had come to Australia way back in the mid 1990's and coached his national league team when he was only twenty years old.  He was pretty stoked that he actually remember him by name before he was able to remind him who he was.  It was a great night, and certainly not one that will be repeated here in Australia for a long time.


We stayed at the Novotel at Darling Harbour which had lovely views of the city and harbour.  As we were having a late night and only staying one night, we decided to just share the room between the four of us.  This meant that we eached shared a bed with one of the kids.  The kids both seemed to sleep well, but hubby and I were comparing stories in the morning about the kids in bed, to determine who had the worst nights sleep.  There was one time when I woke up to a kick in the shoulder to discover Mr Five laying upside down next to me. WTF!!

We took the kids to the Aquarium this morning.  We seemed to race through it much faster than I wanted to, as Mr five was just so excited to walk into the tunnels beneath the shark tanks.But the best part to the busy weekend was that the kids crashed in the car for the three hour drive home.  As for me, I'm not even doing my nails tonight as I'm going to bed early!

Nighty night everyone.

Sunday, May 26, 2013

on 5 comments

Fake Tattoos - Jester / Harlequin nail art

Here is another design I created using the nail tattoos I received from Fake Tattoos.  This one features a little three pointed hat, which I interpreted as a jesters hat, from the Hearts & Bow design.

I created a skittlette with this mani, where I used three designs across five nails.  

For my thumb and pinky, I started with my nail painted with Pretty Serious Poltergeist Puddle and then sponged on a gradient with China Glaze Running in Circles.

For my index and middle fingers, I started with a base of Zoya Ziv and then painted on free hand diamond shapes using Pretty Serious Poltergeist Puddle, China Glaze Running in Circles and black.

On my ring finger, I used a white base and then applied the fake tattoo.  I then place alternative purple and green holographic hexes as a frame around the nail.

Up close my harlequin design looks pretty messy and uneven because it was done by hand, but at a normal distance these looked so effective.  I really loved this mani.

The other thing I discovered is that the Fake Tattoo really have to be placed over a pale nail colour.  I originally place the yellow jester hat tattoo over a base of Poltergeist Puddle, but you just couldn't see it at all.  The yellow colour is transparent, rather than an opaque yellow. Luckily the pack had five little hats, so I still had spares after redoing that nail.


Friday, May 24, 2013

on 6 comments

Fake Tattoos - The Birds

Here is another design I created using the nail tattoos I received from Fake Tattoos.  All these images are from the bird design.

I created a simple blue gradient with a white base and OPI No room for the Blues.  I got the darker shade by blending a little black polish with the OPI and the lighter shade by blending a little white.

I found placement a little tricky with these, because when the paper is face down you can't clearly see the angle of the design on your nails. This mean I had to create my black french tip a little uneven on each nail to cover the gap, otherwise some birds would be just sitting there in mid air.


I know a couple of girls that would be totally freaked out by these nails, complete ornithophobics!

Thursday, May 23, 2013

on 8 comments

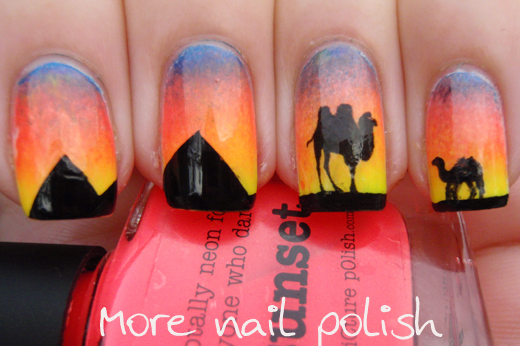
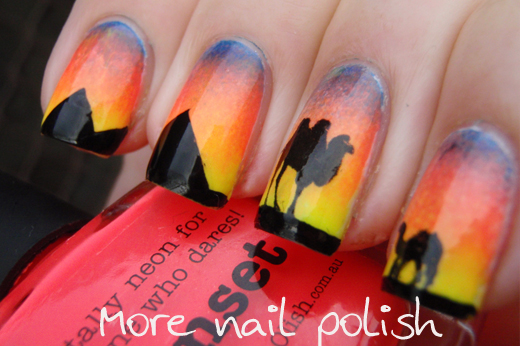
Fake Tattoos - Egyptian sunset nail art

I recently received some temporary tattoos specifically designed for nail art from Fake Tattoos based in Sweden.  These little tattoos are exactly like the ones you would remember wearing as a kid, and the process for applying them is exactly the same.

You just choose the design you want to apply, cut it out, remove the protective film on the front and press it to a dry nail.  Then hold a damp cotton ball or tissue to the backing paper for about 30 seconds and the paper will slip off.

I actually found the range of designs on the tattoos a little quirky and odd, certainly not your usual flowers and swirling designs that you normally see.  Case and point, for this mani, I chose the large camel tattoo from the Arty Design set.

I created a gradient using Picture Polish Bombshell, Sunset and Citrus - which was such a gorgeous gradient just on it's own.


I then taped off the irregular chevrons for the silhouetted Pyramids.  I could have done these as regular chevrons, but to me, the design needed more perspective, so I created them different sizes and slightly overlapping.

I placed the camel tattoo on my ring finger, and attempted a free hand little camel off in the distance on my pinky. You can clearly see the different in fine detail that the fake tattoo provides.


I've done a few nail art designs using some of the other fake tattoo designs which I will show over the next few days.

Saturday, March 30, 2013

on 13 comments

Holo Cadbury eggs mmmmmmm...

Today's nails are bought to you by Cadbury.  I should totally be getting paid for this sort of product placement!  These were created using print at home temporary tattoo paper.  I just found some images of various mini Cadbury Easter eggs online and printed them out the right size for my nails.

For something different, I chose Nfu Oh 61 as my holo base this time.  I used aqua base so the application was perfect, but I also noted how much more opaque Nfu Oh 61 is compared to Layla Mercury Twilight that I normally wear.

My nails feature Cadbury Creme egg, Mars egg, Caramel egg and Dream egg.  My thumb also had a Turkish Delight egg, but I didn't capture it in my photos.


Today I also had the absolutle pleasure of catching up with four other nail obsessed ladies in Canberra. It was so wonderful chatting about polish and life for four hours! I loved hearing stories from the girls about how they got 'in-to' polish, as well as talking about brands and polishes we love, where to buy polish and of course glitter! There was:
We all received some custom polishes from Emily de Molly and got some of the new Alanna Renee polishes that will be released on Monday, plus lots of Easter chocolates! And of course we did the group nail shot. Thanks so much girls, it was lovely to get away from my two little monsters for several hours and talk polish.


Wednesday, January 30, 2013

on 13 comments

Inspired by a movie - Les Misérables

Tonight I have a scheduled post for you, because Mr and Mrs More Nail Polish are heading to the movie theatre!  Whoo hoo.  We don't get out much together so I'm really looking forward to it.  We are off to see Les Misérables.  It's actually the third time I'm seeing it (having seen it twice already with my mum).  It's seriously one of my favourite movies off all time!  I'm not sure how my husband will go with the non stop singing, but I hope he really enjoys it.

My nails today feature the classic image from the Les Mis stage show, which I remember seeing in Sydney when I was an early teen.  I created the image using temporary tattoo paper and placed it over a white nail.  The red and blue parts showing in that image are just from the tattoo paper.  I then painted my fingers to the left of the image red and the ones of the right blue.  These colours represent the red, white and blue from the french flag, which is the background image for the image of the young Cosette.


Last night I also signed myself up for Instagram @morenailpolish  I'm only just working out what I'm suppose to do with it all, and so far it seems like a lot of work to keep updating a blog, pinterest and instagram so I'll just see how I go.  If you have a nails related instagram account and would like me to check you out, I'm happy for you to post your IG names below in the comments.

Friday, January 25, 2013

on 11 comments

Aussie Nails - Show me the money

Money, money, money...  Continuing my week long feature on all things Australian, I share with you my Australian money mani.

I felt so stinkin rich wearing these nails! Australian money is the perfect design to wear as temporary tattoo designs on your nails because the colours are so vivid and gorgeous.

For this mani I put on a couple of coats of Nfu Oh 66 (the light green holo).  Then I just applied my made at home temporary tattoos.  Easy peasy and all finished in under 30 minutes.  For any of my new followers, I did a photo tutorial on temporary tattoo paper last year.


See what I mean, isn't Australian money just the prettiest money in the whole world!  Plus it's made of polymer (plastic) so it can go through the wash and still be fine.  And your useless bit of Australian trivia for the night... did you know that Australia was the first country to get plastic bank notes way back in 1988!


Get the InLinkz code here to add to your blog.

Wednesday, January 23, 2013

on 23 comments

Aussie Nails - Sydney Harbour Bridge

For day three of my Aussie Nails extravaganza, I bring you Australia's iconic Opera House and the Sydney Harbour Bridge.

For this mani, I first created the gradient background using dark blue, light blue and coral pink polishes, over a white base.  I then applied my print at home temporary tattoos of the silhouette of the Opera House and the Harbour Bridge.  Each image on my nail repeats part of the design from the nails either side.  I find I need to do this because my nails are very curved and if I don't, you don't get the full effect.

Lastly I applied Picture Polish Cosmos as the sparkling water beneath the bridge.  I deliberately made the finish on the water uneven to represent the undulating water.  All sealed in with a coat of Seche Vite.  

This mani was one of the longest I've ever endured.  To complete both hands it took me 1 hour and 20 minutes!  Mind you I did end up having to completely redo my middle finger after applying the wrong tattoo image to it and wondering why it looked so weird!

I'm sure I don't need to say how happy I was with the finished look.  It was so pretty from a distance with the combinations of the blue and coral tones, but then so detailed up close for when anyone wanted to see what was on my nails.

Also, I have to add that climbing the Sydney Harbour Bridge is an absolute must do for anyone that ever visits Sydney.  We did it back in 2006 at it was a wonderful experience.  You walk up the stairs that traverse the left side of the bridge all the way to the very centre at the top. You then cross over the middle at the top to come back down the same side of the bridge, but the other side of the road.


For once I was really happy how my right hand turned out too.  Here is a rare photo of it.  I don't usually show my right hand because my damn index finger is always short and stumpy!


Get the InLinkz code here to add to your blog.

Tuesday, January 22, 2013

on 12 comments

Aussie Nails - Australian Native Flowers

Something a little more classy for you today, beautiful Australian native flowers.  I hope you're ready for a little lesson in Australian flora.

I created these nails using good old print at home temporary tattoo paper.  I really love using temporary tattoo paper because I can easily create the designs I want and they apply very quickly - plus they last quite well and protect my nails. The colours are bright and vivid, and you can still see through to the polish you wear underneath (in this instance Layla Mercury Twilight)

The image on my thumb is a Waratah - the New South Wales floral emblem.  These are large flowers, about the size of a softball which are commonly bright red.

The index finger is Golden Wattle - Australia's national floral emblem. With trees and bushes growing between 2 and 8 metres high, these yellow flowering plants are a stunning mass of yellow in spring.  Each individual blossom is smaller than a pea, but it's like a little fluffy yellow pompom.

The middle finger is the Sturt Desert Pea - the South Australian floral emblem. A facinating flower with bright red vertical flowesr with a dark blackened eye in the centre.  My tattoo got a little crinkled when I tried to move it, so you can't see the centres too well.

The ring finger is the Royal Bluebell - the floral emblem for the Australian Capital Territory (where I live). Pretty violet blue flowers are up to 2-3 cm in diameter and can either be erect or nodding.  Despite being our floral emblem, I don't see many of these around town.

The pinky finger is the Kangaroo Paw - the floral emblem for Western Australia.  These are very interesting flowers, but I usually only get to see them at Floriade or the Botanic Gardens.  They have tubular flowers that are coated with dense hairs and open at the top to create the claw-like appearance.


As I only have five fingers, and I wanted them to match on each hand, I hand to miss out on the floral emblems for Victoria, NT, Queensland and Tassie, but there's always next year. And while it's actually really difficult to see what these are on my nails, the overall bright and contrasting colours were really pretty.


Get the InLinkz code here to add to your blog.

Monday, January 21, 2013

on 15 comments

Aussie Nails - Australian Beer

G'day Mate!  This coming Saturday is Australia Day, so to start the celebrations I'm doing a week long tribute to all things Australian, and I'm putting them on my nails.  I started this tradition last year with a bunch of Australian themed nails, and this year I have some doozies for you (although I've had to think hard to come up with some new ideas)

Today I'm really taking the blog into deep bogan territory.  I bring to you, Australian Beers.  
  • On my thumb, although very hard to see is Pure Blonde - pretty much my regular tap beer. 
  • Index finger is Carlton Draught - a good alternative if they don't have Blonde on tap.  
  • Middle finger - Victoria Bitter, or VB as it is well know, I actually really don't like VB, but its brand is green and it looks pretty. 
  • Ring finger - Fosters - I included it for two reasons, 1) it's pretty and blue 2) because its well marketed overseas as an Australian beer and people will hopefully recognize it - and in all truthfulness, I've never even tried Fosters, although I hear it's not great!
  • Pinky - Toohey's Extra Dry - used to be my favourite beer a few years ago, but I don't drink it much now.
The guys at work thought these nails were pretty cool and it finally made them a little interested in my nail art.  When I mentioned to my mum I was going to do beer nails she was wasn't too sure about the idea.  She thought it might encourage the notion that Australian's are a bunch of beer drinking yobbo's.  And the truth is, that especially around Australia Day, I think a lot of Australians are!  (BTW - if you don't know what a 'yobbo' or a 'bogan' is - I'll cover that in an upcoming post).

The base I chose was Layla Gold Idol.  I wanted something holo but I wish there was an amber holo more the shade of beer, but still with the same strong flame.


I'm adding a single inlinkz to all my Aussie Nails posts this week, cause I'm hoping lots of other Aussie girls will include links to their nails, even if it's only the ones they do for Australia Day next Saturday.  So Aussie girls, please feel free to add your link and grab the code below.


Get the InLinkz code here to add to your blog.

About Me

My photo
I live in Canberra, Australia with my husband, Mr Ten and Miss Eight. My blog is all about nail polish, and a few other bits in between. You can contact me at morenailpolish@iinet.net.au