Showing posts with label Nail art. Show all posts

Monday, February 23, 2015

on 2 comments

Teal Ribbon Day for Ovarian Cancer Awareness

Each year in February, Ovarian Cancer Australia runs a national Ovarian Cancer Awareness Month campaign to highlight the symptoms of ovarian cancer, to honour those women who  have died from the disease, and to raise funds for their programs. One such awareness program is the Colour for Cause nail polish set.

Chemmart Pharmacies across Australia will be stocking a limited edition Designer Brands teal nail polish pack called 'Colour for a Cause'. The pack comes with two full sized polishes, a white and a teal and retails for $6.99, with 100% of the proceeds going to Ovarian Cancer Australia

If you would like to see swatches of the two colours by themselves, then check out my post from last year.

For this year's mani, I once again created the flower symbol from Ovarian Cancer Australia, with the center featuring a teal swarovski crystal.  My index finger was a watermarble using the teal and white polishes and on my pinky I stamped a teal ribbon.


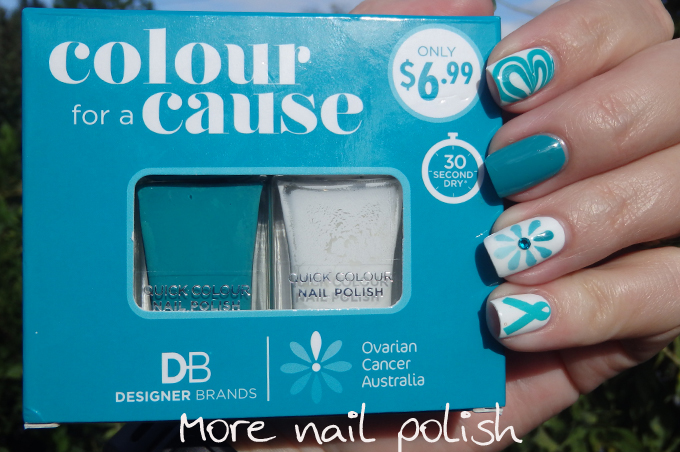


Teal Ribbon Day is Wednesday 25 February, so make sure you wear teal nail polish on that day to show your support for Ovarian Cancer. 
Colour for a Cause teal nail polish packs are be available in Chemmart Pharmacies during the month of Feburary. 
 
Polishes provided for consideration previously.

Friday, August 22, 2014

on 3 comments

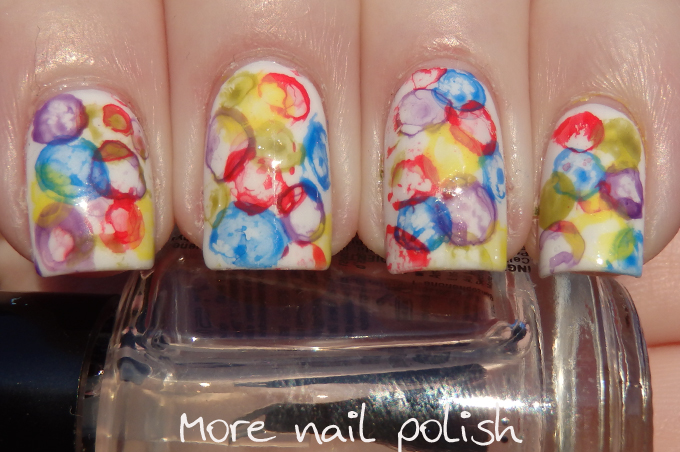
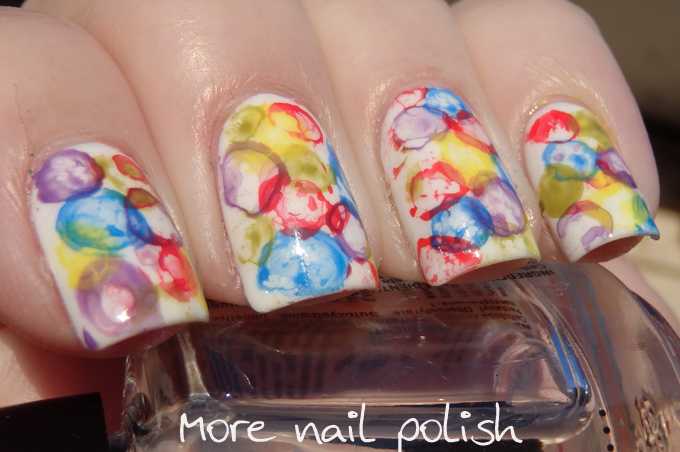
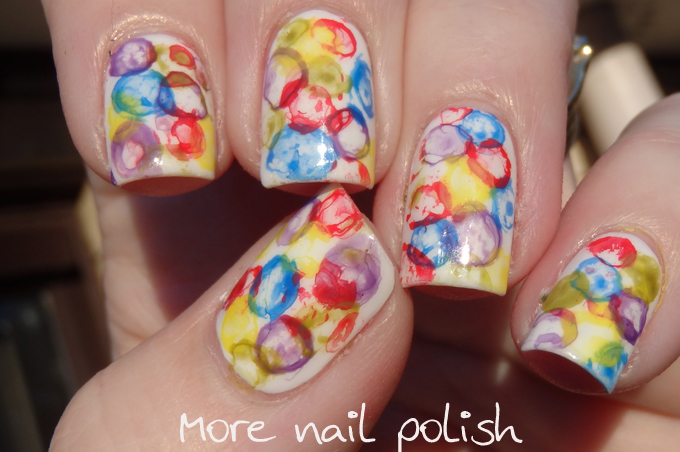
Bubbles and gradient and glitter, oh my!

Hey everyone. I had a rather epic 13 hour work day today. We released a new website application live tonight, something my team has been working on for about a year, so it was pretty exciting and a huge milestone for the team.  Although I'm rather exhausted from the last extra push to get it over the line in the last few weeks, it gives you quite an exhilarating high achieving something you've been working on for such a long time.

Anyway, enough of work, and let's look at the nails. Remember my rather nasty previous attempt at doing a bubble mani?  The big fail that time was that I didn't realise you should use a matte top coat before attempting to create the water bubble.  Ta da. Look at the difference a matte top coat makes.

Again I used some watered down acrylic paints for the water dots.  For the gradients I used a range of Picture Polish colours and on my pinky I used two coats of Kester Black Milky Way silver holographic glitter.

Pretty yes?  I like the bubble so much more now and I think I can attempt doing them with the bright colours again now that I know what I'm doing.


Tuesday, August 12, 2014

on 4 comments

Nearly nekkid - but with pastel rainbow tips

Gosh, I haven't gone this close to being naked in a very long time! 

I had quite a long free edge (before I filed them down a bit) so I thought it would be nice to do some sort of design as a french tip.  I've never tried stamping the french tip on, even though I have so many stamping plates that have french tip designs.  In fact I've hardly seen anyone using those french tip stamp designs. Does anyone actually use those?

I started my mani with two coats of JOSS Oh So Natural base.  It has a slight tint to it, but is still a perfect nothing shade on me.  Once that was dry, I used french tip nail vinyls to mark off the tips.  Then I started painting vertical stripes using a fine nail art brush and a range of pastel rainbow colours.

The shades I used were Picture Polish Swagger, Wisteria and Candy, OPI I can't cope-a-cabana and Ulta3 mojito.  I then topped it off with a layer of INM Northern Lights gold holo glitter topcoat.  The top coat smeared some of the colours on my middle finger, giving it a slight blue/purple cast, but it's probably only something I would notice (and I really should stop pointing out the flaws in my manis to you all :))


Sunday, August 10, 2014

on 7 comments

Cats in print, inspired by Start Spreading the Mews ModCloth dress

Hey everyone.  I had every intention of post this mani last night, but completely unlike me, I fell asleep on the sofa whilst I was cuddling the kids before bed.  My husband put the kids to bed, and woke me enough to go to bed too.  I was fast asleep in bed by 8.30pm - on a Saturday night!  And what's more, I slept through until 8.30am too!  12 glorious hours of uninterrupted sleep. It was so awesome!  But of course it meant I didn't post any nails to my blog, or paint any new design at night.  A small price to pay for such awesome sleep!

Ok, lets look at these cute nails I did to match another ModCloth dress.  This gorgeous dress is call Start Spreading the Mews and it's covered in news print.  But what makes this so cute is that all the news articles and photos are of cats.

For the mani, I used the Lorem Ipsum text from Vivid Lacquer plate VL004.  I paired that stamping up with some cats from Konad Plate M91.  I love black and white nails, and this combo of cats and print is especially cute.


Thanks for stopping by.

Sunday, August 3, 2014

on 2 comments

Bright bubbles - sort of!

So, I tried my hand at creating those beautiful round bubbles using watered down acrylic paints.  This mani did not turn out in any way that I had imagined it, but in real life it actually looked very striking and bold.  Close up nail photos however doing nothing for it!

I tried to follow the bubble nail art tutorial by OhMyGoshPolish on Instagram.  Those 15 seconds was all I thought I needed! HA! *in a perfect Edna Krabappel voice*  Since creating this mani I discovered where I went wrong by watching her YouTube video on the same mani.  I didn't put a matte top coat down on my white base!  This meant that by circles of each bubble just kept sliding away and wouldn't actually stay as bubble. 

Oh well, lesson learned!  I definitely want to try this again with a matte top coat down, cause this effort looks more like a circular splatter mani. 


Friday, August 1, 2014

on 6 comments

Jeans nails for Jeans for Genes Days

Today is Jeans for Genes Day here in Australia. Jeans for Genes Day is a national day when people wear their jeans to raise much-needed funds for research into birth defects and diseases such as cancer, epilepsy, and a range of genetic disorders. To show my support, I created Jeans nails.

In creating these nails, I used a technique that I saw on Instragram ages ago, and of course I can't find he account that I saw it on. If I find it, I'll update here, but I just wanted to note that this is not my original idea.

I started with a base of Ulta3 Block it out.  To create the fabric texture, I actually used an old pair of jean, turned them inside out and down near the hem I painted polish onto the fabric.  I then scraped that with a scraper, picked up the polish with a stamper and then stamped it onto my nails.  Therefore what you see here is actual denim print.

I used gold acrylic paint to do the stitching and added OPI matte top coat.  I pressed the gold studs into the matte top coat when it was wet, and amazingly they have stayed there all day.  I love how these turned out. What do you think?


Thursday, July 24, 2014

on 9 comments

Circular gradient and stamping with Lily Anna Plate

Happy Wednesday everyone.   How is your week going?  I'm tired.  My team and I are all so busy at work, busting our buts to deliver on a bunch of projects that are all due right now (or actually a few weeks ago).  I have to say that I really enjoy my nail polishing hours in the evening as my way of unwinding and giving my brain a chance to recover.

Today's mani is one that just happened without me really concentrating on it, and I love it so much.

I created a circular gradient using Ulta3 Honolulu, Picture Polish Instinct and Ulta3 Blue Marlin.  I did the gradient over a white base, which really made the colours pop, and then I stamped using Mundo de Unas Black polish and Lily Anna 03 plate.


Saturday, July 12, 2014

on 6 comments

Music lines with red ruffian, inspired by ModCloth dresses

Here is another ModCloth dress that caught my eye for nail art inspiration.  This gorgeous dress is white and features music lines all over it.  It is accented with a rich bright red bow around the waist.

To create my matching mani, I used on the the very first stamping plate I owned, a KONAD brand one.  Konad plate m73 features lines of music and it stamps with such fine details.  I stamped with black Mundo de Unas polish over a white base and then free hand painted a red ruffian line using OPI Big Apple Red.


For a bit of extra fun, I painted the underside of my nails red - Louboutin style.


Friday, July 11, 2014

on 9 comments

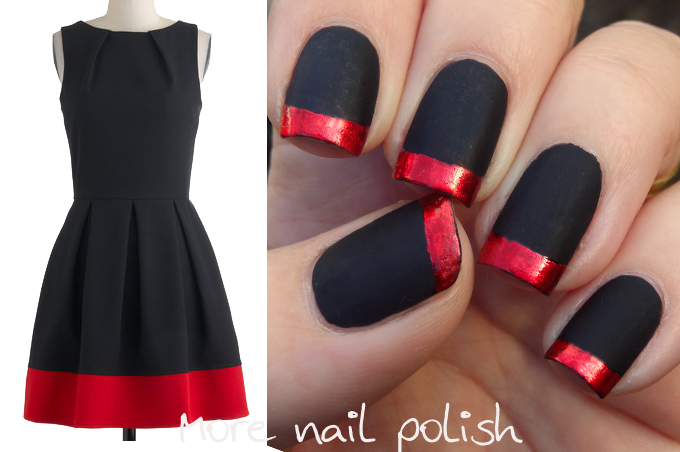
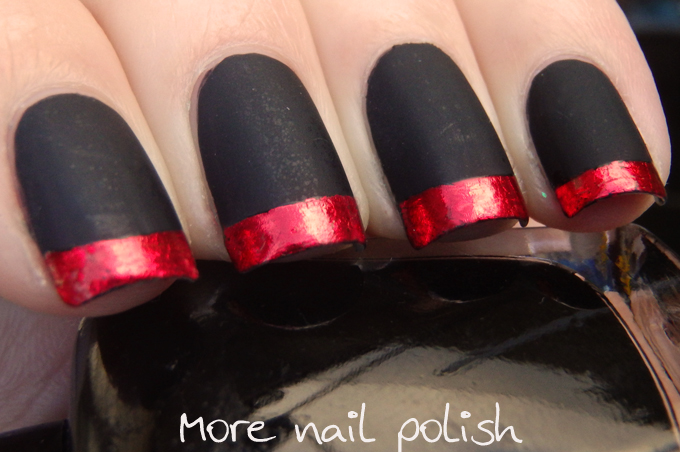
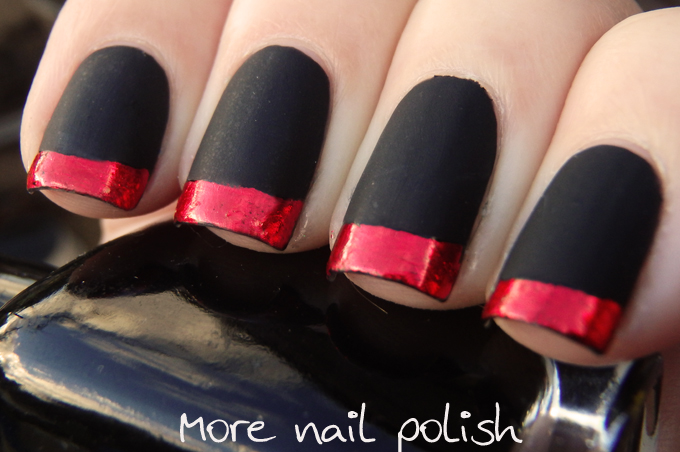
Matte Black with red foil tips, inspired by ModCloth dresses.

I recently received an email from ModCloth, asking if would be interested in being part of their Nail Klub and Dresses challenge. The idea is to check out their massive range of dresses, pick one and interpret it in nail art.  

I'm always looking for nail art inspiration, and let me tell you, browsing through their range of dresses has given me so many mani ideas. I've already bookmarked 10 different dresses that I plan to interpret into nail art.

Here's the first one that grabbed my attention.  This simple black dress with a red band around the hem gave me immediate nailspiration.


To create this look, I painted my nail with black polish and top coated using quick dry top coat.  I then applied a layer of OPI Matte top coat, but any brand matte top coat would be fine. I really wanted the red tips to pop, just like the red band does on the dress, so rather than using red polish, which wouldn't show up very well, I used red nail art foil.

I used nail art foil glue to paint a french tip on my nail and then let that dry.  Once the glue was completely dry and transparent, I applied the red foil.  To finish the mani off and make it last the whole day, I applied Picture Polish Revolution to just the tips.  Revolution is a water based glitter base coat that doesn't make the foil wrinkle up for me.


I hope you like this look as much as I do, and I hope you don't mind seeing more nail art inspired by some ModCloth dresses.

Wednesday, July 2, 2014

on 6 comments

Rainbow dotticure

This mani ended up a little random.  I didn't have anything planned as I started dotting, except to switch up the colours into a rainbow.  I ended up doing an uneven wave across my nails with gaps at the top and bottom.  I really liked the randomness of the design, plus it was quick and easy to do - so double thumbs up from me.

I used one of the new Ulta3 shades called Cloud Nine (swatches coming soon) for the base.  It's a really lovely pale neutral nude shade that is opaque in two coats = win!

For the dots I used Picture Polish Frank-n-furter (red), totes (orange), OPI I can't cope-a-cabana (yellow), Ulta3 Kiwi Kaos (green), Picture Polish swagger (blue), Picture Polish Blue marlin (indigo) and Palette Play (violet).


Tuesday, July 1, 2014

on 4 comments

Rainbow gradient stamped with rainbow Swarovski crystals

Here's another rainbow mani I've worn in the last week.  

Gradient was created using Picture Polish Frank-n-furter, Chillax and Swagger and OPI I Can't Cope-a-cobana (my current go to shades for rainbow colours). Stamped with Mundo de Unas white polish.

On my middle finger I pain stakening picked through my 350 pack of mixed Swarovski crystals to select a rainbow of colours.  Once again my evening polish painting lighting let me down thinking I had selected two oranges, when I had in fact selected one orange and one pink.  I swear I'm not colour blind.  

Despite the fiddly-ness of sorting through the crystals, I really do love these over the regular plastic resin ones, the sparkly finish after top coat is very noticeable.


About Me

My photo
I live in Canberra, Australia with my husband, Mr Ten and Miss Eight. My blog is all about nail polish, and a few other bits in between. You can contact me at morenailpolish@iinet.net.au