
A couple of days ago I posted another magnetic nail polish mani and I commented how much I love magnetic nail polish. I also commented how I feel the need to own every sort of magnet there is. That really got me thinking about nail art magnets and the designs and I set to work this weekend to create some designs of my own.
This post will hopefully explain to you how you can make your own nail art magnets at home and use them with any magnetic polishes you have.
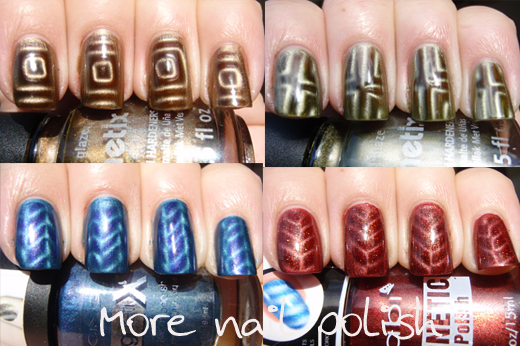
Here is a picture of the four magnet designs I created. Read on to learn how to create these yourself.
What are you going to need?
- a regular flat fridge magnet
- scissors
- pen
- card or plastic
- sticky tape
OK. Firstly, did you know that pretty much every single flat fridge magnet will create a beautiful line design? You know the ones that you usually get from trades people or with handy calendars on them. It's true. But you will need to experiment with the magnets you have to see which ones create the size lines you want. I tried about 5 different magnets, some had lines about 5mm apart, others were much smaller (like the one below) with lines about 1mm apart. Then there were lots in between - which is the size I created my new magnets out of.
As you can see, if you just want to do a regular line design, you can curl your magnet around your finger a bit to get the design all the way around. Especially if you have really curved nails sideways like I do.
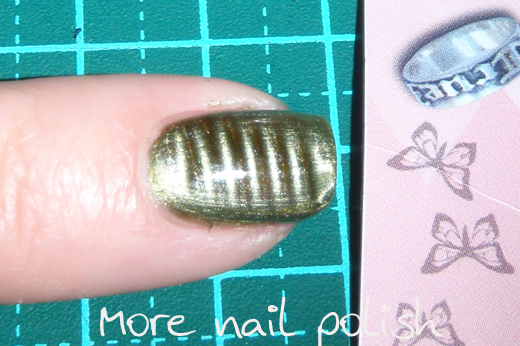
Here is the example of how this magnet turns out. I love how narrow the lines are on this one!
Make sure you're happy to destroy the magnet you choose, because you will be cutting it up. Next, grab your pen and draw lines on the printed side of it indicating the lines of the magnetic polarization. This really helps with positioning your designs later. Here I've photographed a piece of paper with lines on it, to give you the idea of what to do.

Pretend that piece of paper above is your magnet and grab your scissors. Then cut up the magnet to form various designs.
This first design is a simple chevron. Just cut the magnet at 45 degree angles and then line up the magnet pieces so the lines are on a right angle to each other.
This design is the chevron.

I then made some zigzag lines by cutting the magnet in thin strips on a 45 degree angle, about 1-2mm thick. I then aligned the strips so the lines formed a zigzag.

Here is the zigzag design.

Next, I cut small triangles with the magnetic lines going outwards which creates a multiple cross effect.

Here is the multiple cross effect.

Finally, I cut small triangles again, but this time with polarization lines going around sideways. This creates a small square in the middle with concentric squares circling it.

Here is the concentric squares design.

Here is what my little magnets look like. One you have the designs lined up, grab some double sided sticky tape and apply some to a small piece of plastic. I used the back of an old credit card that I had cut up. I then transferred my magnets onto the sticky tape, with the printed side down. I then did some tests on a nail to see if the magnets were lines up ok. If you need to adjust a magnet you can just lift if off the sticky tape and move it. I did that with the chevron design so that both sides lined up when applied on my nail.
Finally I stuck a little label on the other side to indicate what each of my magnets were.

I'm really happy with the concentric squares design, because it's something I haven't seen anywhere else yet. I wasn't quite able to get the lines on the cross to line up perfectly yet, so a little fiddling with the magnet positioning on the card is required.
There you go, now you have your own fancy magnets for nail designs. Have you tried making your own nail art magnets? I love to know if this works for you and to see any other designs you can come up with.


OMFREAKINGGOODNESS, you have to be some kind of GENIUS woman!!! Is there no limit to your astoundingness??
ReplyDeleteI agree with her! U r a suuuper genius!!
Deletegreat idea!
ReplyDeletethis is a great way to maximize magnetic polishes!
^_^
Very Clever :-) Great post!!
ReplyDeleteThis is like THE MOST CREATIVE IDEA EVER!!!
ReplyDeleteThere are billions of magnets like that on my parents fridge!
I think it needs some spring clean ;-))
Thanks for the idea!!!!
Thanks for de idea and the tuto ;D I didn't know fridge magnets can make so beautiful designs :D
ReplyDeleteThis is brilliant!!!!
ReplyDelete@#$%^&*#$%^&* YOU my dear, are a freaking genius!
ReplyDeleteOh my gawd what a great idea! Just think of all the designs you can come up with. Thanks for sharing! :D
ReplyDeleteOMG BRILLIANT!!
ReplyDeletehaha nice job! Very crafty!
ReplyDeleteI have been wondering how exactly to make my own and you seriously nailed it! ;) Thanks for the great tutorial!!! xo E
ReplyDeleteThis is SO COOL!!
ReplyDeletethese are great. i really like the concentric design!
ReplyDelete"OMFREAKINGGOODNESS, you have to be some kind of GENIUS woman!!! Is there no limit to your astoundingness??"
ReplyDelete2! I think the same!
Wow, I'm amazed. This is brilliant! Thanks for sharing! :)
ReplyDeleteSo awesome!!! Thanks for sharing!
ReplyDeleteWow!!!!! You are genius!! Thanks for sharing!
ReplyDeleteAmazing! This is so fantastic, as I'm completely displeased with the cheapie one mine came with! I could kiss you!
ReplyDeleteBrilliant!
ReplyDeleteWOW! What a brilliant idea! Thanks so much for sharing! :-)
ReplyDeleteLove it!
ReplyDeleteohhh you are awesome! thank you so much for sharing your incredible idea!!
ReplyDelete*applauds* Brilliant!
ReplyDeletecan't wait to try this. i may actually like the magnetic polishes better if i have my own magnet. i'm not a big fan of them...yet!
ReplyDeleteThis is such an awesome idea!!!
ReplyDeleteThis is freakin' awesome!!! Such a genius idea!
ReplyDeleteBrilliant woman!!!! I started cutting a fridge magnet up to try this weeks ago and lost interest and started playing with my holo polishes agian. I'm to much of a crow. Lol "Must have the rainbow shiny." I'm going to start up again with this. Thanks
ReplyDeleteThis is fabulous! Thanks for sharing!
ReplyDeleteYou never cease to amaze me!
ReplyDeleteYou are absolutely a genius!!! Thank you so much for sharing this tip with us!!! :)
ReplyDeleteThat is awesome!
ReplyDeleteYou are amazingly resourceful! Thank you for sharing this!
ReplyDeleteGENIUS! Thanks :) Now I need to find some flat refrigerator magnets >.<
ReplyDeleteI knew it wouldn't be long before someone cracked it and sussed out how to do it!! Well done you are a very clever and a BIG thank you for sharing this with us.....now....how to do a fishnet magnet????
ReplyDeleteAmazing! This is so creative! Thanks for sharing :)
ReplyDeleteWow, you are amazing!! Genius!!
ReplyDeleteBrilliant!! Thanks for sharing!!
ReplyDeleteThat's. Really brilliant! I especially love the concentric squares, that magnet is so unique :)
ReplyDeleteThanks so much for sharing! You are a genius!
ReplyDeleteLove the square one
ReplyDeleteHoly freak! You're amazing! Thank you!
ReplyDeleteOMG you are so clever! Thanks so much for sharing! :)
ReplyDeletethanks for sharing!! this is soo amazing!! :D
ReplyDeleteI love you so hard right now! I'm sick to death of all the magnetic polishes coming with that silly wavy design that is always too big to show up on my skinny nails! The only magnet I have that I really like is the China Glaze one with the star and chevron and lines...
ReplyDeleteI had experimented with fridge magnets once, just to see what would happen, and noticed the lines... but I never thought to cut them up!
amazing!
ReplyDeleteThis is a brilliant idea! I'll definitely have to give this a go
ReplyDeleteYou are so clever... who would have thought to try this one! Thanks for sharing!
ReplyDeleteAs always...you're an absolute genius! What a great idea! :D
ReplyDeletePretty cool!
ReplyDeleteThis is awesome Cathy! Such a great idea!
ReplyDeleteThe first comment in the thread is exactly what I wanted to write lol. Lady you really are a genius!!! I have to give this a try, thank you so much for enlightening us all!!!
ReplyDeleteI just Googled this a couple days ago thinking there must be some way to do it! Thanks!
ReplyDeleteI agree, the first comment in this post took the words out of my mouth!! Is there nothing you can't do?!?!?!!??! This is so awesome I cant wait to try this today!!!!!!! How creative :D
ReplyDeleteWOW WOW WOW! OMFREAKINGHELL I LOVE YOU!!!!! People in my house think I'm crazy right now because I running around screaming and digging around for all those stupid magnets! I heard you could use fridge magnets but I never thought about those business ad mangets before!!!!!!!!
ReplyDeleteSweet! I just got my 1st magnetic polish today too. lol. definitely wanna try this!! Thanks :)
ReplyDeleteSooooo cool :)
ReplyDeleteWow! This is amazing! I really love the square :)
ReplyDeleteI LOVE the concentric squares design! Awesome!
ReplyDeleteLove this! Definitely puts some life back into the magnetic polish trend.
ReplyDeleteI'm gonna add my "awesome" because...it is! I already used a bent piece of magnet tape on my China Glaze. I have curved nails too. I wanna try this too. Think I'll go to the dollar store with a bottle and see what magnets I can find.
ReplyDeleteThis is so Clever! Just another nail trick I have to try!
ReplyDeleteThanks xo,
http://missmelissafashionandbeautyblog.blogspot.com/
This is genius! Thank you so much for sharing this post. I can't wait to try these out!!
ReplyDeleteThis is so amazing, thanks for sharing!
ReplyDeleteThanks for sharing this! I have bookmarked it, so that I can try to make a magnet that can be curled some time. I especially liked the cross and the square design.
ReplyDeleteWOW!! aawesome ideaaaa :D thanks for sharing this!
ReplyDeleteYou are the goddess of nailpolish, I love it sooo much. Would never have thought of this. I avoided magnetic because the plates were so boring and everybody had them. Watch out shops! Here I come!
ReplyDeleteI finally got around to trying this today and my chevron came out awesome. I'm most happy with that one. Plus it's a way better magnet the China Glaze one. That chevron design never comes out right. I also tried the cross one and the concentric squares but my squares look more like a spiral somehow. Lol Those last two are really hard to do on my nails since they are so curved. I'm thinking of maybe magnetizing the design onto some polish on a plastic bag and then when it dries I can peel it off, cut it out, and stick it on. It'll be just like your dry water marbling. I'll let you know if I try that method and it works. :) Thanks for this great post though! I really love playing with the magnets. It's just like with frankening - you feel kind of like a scientist with the experimenting and creating your own new things. I love it! :D
ReplyDeleteLeslie, the dry marble technique with a magnetic polish is a brilliant idea. I also have trouble getting magnetic designs around the side of my nails because of a strong C curve. Thanks for sharing your idea!!
DeleteI just got my first magnetic polishes from a blogsale. I tried them and noticed the magnets included don't work for my long, curved nails. I revisited your post and tried some fridge magnets that work wonders, too bad I can't cut them 'cause they are picture magnets. For now, I will use those to magnet my entire nail. Thanks for your valuable tips ;)
ReplyDeleteGUESS WHAT I'M DOING THIS AFTERNOON? :D
ReplyDeleteI just found your blog and I am so excited! *followed*
Oh my! These designs are better than any of the store-bought ones!
ReplyDeleteToo bad we don't have those thin magnets around here...
First off Luv your blog site! This is so cool, Thanks for sharing with us!!!
ReplyDeleteAmazing!!!! Way better then the store bought!!!
ReplyDeleteHow did you come up with such an idea?
ReplyDeleteMetallic Nail Polish
I've tried this and it didn't work for me. I'm wondering the trick.... Are my magnets too thin? Too close. Wrong polarization thought for the life of me I can't figure out the right. Help!
ReplyDeleteI've tried this and it didn't work for me. I'm wondering if I'm cutting my magnet too thin? If the magnets I have are too weak? Spacing wrong? Please help!
ReplyDeleteI've tried this and it didn't work for me. I'm wondering the trick.... Are my magnets too thin? Too close. Wrong polarization thought for the life of me I can't figure out the right. Help!
ReplyDeleteThis is so cool! Thank you for posting this tutorial :)
ReplyDeleteThis is a fantastic idea!!!!
ReplyDeleteOMG - unbelievable, brilliant ?X!
ReplyDeleteMichelle,
ReplyDeleteWe absolutely love this guide!
We have been creating an online resource guide to nails and we had to include this post. You can find yourself under the Nail Art section. We would love your feedback!
http://www.diamonddesignsuniforms.co.uk/resources/nailresourceguide.html
Thanks
Mark
Michelle,
ReplyDeleteWe absolutely love this guide!
We have been working on an online nail resource guide and we just had to include this. You can find your post under the Nail Art section. We would love your feedback.
http://www.diamonddesignsuniforms.co.uk/resources/nailresourceguide.html
What an amazing idea!!!!! Thanks for sharing!
ReplyDeleteStanding Ovation!!! I think I would have been selfish and kept this to myself. That's why you are Awesome!
ReplyDeleteOmg i cant wait to try it ..i love it soooo much thank you
ReplyDeletegenius. i was just thinking they should make curved magnets. you should make them and sell them. I'm too lazy to do all that. But it's really cool
ReplyDeleteI'll say it again just to really hammer it in, you're a genius! i have been researching this and wanting to come up with a few of my own. now i know how!
ReplyDeletethank you!
You are a total genius! I've been wanting to try to make my own shapes, and now i know how!
ReplyDeleteThank you!
I thought it is very difficult to do nail art by ourself. After reading this post it was very clear it is very easy.
ReplyDeleteElle18 Nail Polish