Sunday, June 30, 2013

on 9 comments

Local nail meet up - aka learn to watermarble

Today I had the absolute pleasure of meeting up with some other local nail polish addicts. This time around we planned to do a water marbling extravaganza, where Sylvia aka @lilyandjinks instructed us on the dos and don't and helped us all through our problems.  We also got a chance to play with stamping with some amazing assistance from Julia from Messy Mansion stamping plates. But that is a-whole-nother blog post on it's own - cause I have to share some of those awesome tips.

Today really was the first time I got water marbeling to work successfully directly onto my nails.  I'd pretty much given up after so many failed attempts.  These manis aren't great, but I'm certainly happy with them and I learned so much.

I painted my nails in Gelicious French White, so I had a set white base ready for my marbeling attempts.  The gel base was fantastic, because I was able to wipe off any really nasty looking nails and not have to paint my nail white and start again.

This first design I created using Picture Polish flirt, candy and fairy floss.


In this next design I was learning about how to create different patterns in the water.  So while it certainly don't look like a cohesive design, I learned new stuff.  This used Picture Polish sunset, lime lite, crazy, wisteria and hotlips.


I've also got another watermarble design, but I'm going to wait a until Thursday before I show you that one.

As the sun was just setting, we realised that we hadn't taken our obligatory group nail short.  Everyone was ready, except me, I was back to plain white gels after practicing my stamping techniques. Bare white nails would certainly not do for a meetup photo.  

I quickly grabbed the three China Glaze polishes that Kate aka @katersnails had used in her water marble, cause her water marble looked amazing.  I don't even know what three colours these are. This is a super rushed, 15 minute effort - but considering that, I'm amazed how good they look.


Check us out - Kate and I have #bestietwins4lyf 


And double yay - check out our awesome watermarble efforts.  Fantastic job ladies, we were the boss of watermarbling today!


It was a messy process.


I'm sure I made the most mess out of everyone, but it was a blast!


Thanks so much ladies, I'm really looking forward to our next meetup already!

Everyone else, if you every get the opportunity to have a meet up with other nail polish addicts, DO IT!  Its not very often that you can talk to people in real life about nail polish and they 'get it'.

Saturday, June 29, 2013

on 4 comments

Lynnderella - Spot On with rainbow gradient

Lynnderella's Spot On, from the Mixed Feelings collection is the latest incarnation of Connect the Dots, and I absolutely adore it.  It has assorted black and white glitter shapes in a multi-shimmered clear base.

For my base I did a bright summery rainbow gradient to banish the cold winter here.  I started with a white base and sponged on Picture Polish Citrus,Ulta3 Honolulu, Picture Polish lime lite and Ulta3 Blue Marlin.


I even photographed my right hand cause I liked some of the glitter shapes on these nails.


And just for funsies, here is a pre-cleanup picture of the sponging.  I did a coat of PVC glue on my skin, which when the polish is dry makes clean up really easy.


Friday, June 28, 2013

on 4 comments

Ulta3 - AFL Fan Nails

Popular Aussie polish brand Ulta3 have recently released a set of 18 boxed polishes called Fan Nails.  There is a set for every AFL (Australian Football League) team that contains nail polishes in official teams colours.  They sent me some of the sets to review and to create some fan nail designs, so lets see how I went.

The four sets I received were Sydney Swan, Fremantle Dockers, Hawthorn Hawks and Collingwood Magpies.  As you can see, each set comes with three bottles of polish.  With all four that I received, there were two coloured polihses and a clear polish, basically because those teams colors only have two colours. But there are many sets that have three colours, such as the Suns, Eagles, Power, Lions, Giants, Cows, Bulldogs and Saints.  

Most of the sets appear to contain existing polishes, such as Lily White, Black Satin, but some of the sets definitely have new colours.  Unfortunately all the promo material I've got doesn't show the polish names on any of the bottles, so while some colours look new, I cant tell.  I'm going to have to check out the rest of the sets in real life to see.


Each set has also comes with a Ulta3 fan nails file - which is really coarse and probably only something I would use in an emergency.  They also come with three sheets of nail sticker guides to help you in creating your fan nails.  One just has straight edges, another has regular curved french guides and the third is a chevron design.


The first design I created was the Sydney Swans design, and I chose to follow the promo picture and create the same design that appears on the side of the box. This set comes with Lily White, Scarlet, and Clear polish. I started with a white base.


I then applied one of the chevron stickers to the tip of each nail and painted the tip in red.  Scarlet is a super pigmented and vivid red creme, so it's just perfect for this sort of thing.


After I painted each nail, I pulled the chevron sticker off.


The chevron design sticker is really easy to use and you get a nice clean and neat finish. You don't get a sharp tip at the apex of the chevron using the sticker, but if you wanted it to be a sharp point you could touch it up with a fine nail art brush. 


Next up is the Collingwood design, and again I chose to do the simple design that is pictured on the box for this team.  This set comes with Lily White, Black Satin and Clear polish.  I started with a white base and when that was dry I used the straight sticker guides to tape my nail in half.


I then painted one half black, peeled the stickers off and applied top coat.


The next design is for the Fremantle Dockers. This set comes with Lily white, Royal and Clear.  Royal is a new colour to me.  I do have a purple polish called Royal from the silver capped Speed Dry Ulta3's, but this is a different purple.  It's actually a very dark purple and this first photo in full sun actually makes it look a lot lighter than it really is.  The photos with the white chevrons are more colour accurate for this polish.


I chose to do a different team design for this mani compared to the one on the box, because the one on the box for this was the same chevron design as I already did for the Swans mani.  I love this purple colour, but I actually think it's a bit too dark to be the right Dockers purple colour.

For this mani I just created a double chevron design which matches the team jersey.  I used Lily White and a fine stripper nail art brush.


The last fan nail design I created was with the Hawks set.  This set comes with two new colours, general mustard and fudge brownie.  General mustard, apart from having an awesome name, is a great yellow.  It has a very slight silvery shimmer to it too. I don't have photos of fudge brownie on it's own, sorry.

Last year I created Hawks nails for the AFL grand final, so I thought it was funny that I actually got this set to review. Back then I had to franken a yellow polish to get the right shade, so general mustard definitely filled a gap in my collection.


I originally used the provided white straight sticker guides to mark off my nails, but I didn't like how thick the lines looked, so I took them off and just did thin brown lines freehand using a long bristled stripping brush. Of course I could have used scissors to cut the tape up into smaller lines, but the truth was I didn't have the patience to tape up my nails that much.  In the end I was really happy how these turned out for free hand stripes. 


The Ulta3 AFL Fan Nail boxed sets retail for $9.95 and are available from selected pharmacies, AFL stores and Club Merchandising stores.  They are also available at participating supermarkets.  The Ulta3 Facebook page has a stockist locator app which can help you locate shops that stock Ulta3 polishes.

Are you and AFL fan?  Who you you support?

Products provided for review.

Thursday, June 27, 2013

on 8 comments

Glam Polish - Nickle Nackle and Indigo

I have been wearing some pretty serious cranky pants today, and that pun (if you noticed it) was totally intended!  Firstly, I work for the federal government, so last nights leadership spill and resulting Prime Minister and Ministerial changes meant work was pretty much chaos today.

But what really made me fasten my cranky pants tightly around my waist was being cart jacked at least seven times trying to score a bottle of Pretty Serious Naughty Night Shift Nurse this morning at 9.00am.  Amidst the craziness at work, I was able to sneakily jump onto the site before 9.00am and sit refreshing over and over as the clock ticked to 9.00am..  As soon as it appeared I grabbed a bottle into my cart and proceeded through paypal checkout immediately. It was only after clicking all the paypal oks, that it would tell me that the item was no longer in my cart.  At least seven times I added it to my cart, went through paypal and was cart jacked every time, untill about 9.06 when the site told me that it was sold out.  

I'm so disappointed. It's now the only gap in my entire Pretty Serious collection (thanks to the generosity of Alanna who decanted me some Golden Ticket). I certainly learned my lesson and will check out through the site checkout next time, rather than through Paypal so I'm not cart jacked again. I was a ninja, but technology failed us!  I guess the most frustrating part for me is that we were told we wouldn't be cart jacked, and we were. Plus, and maybe this is just because I work in IT, I really hate it when a user is disadvantaged because of poor technology. Its the first time I've been cart jacked, so maybe I'm just taking it hard, especially cause I know it's something lots of girls experience all the time with restocks.  

Before I get flamed for being a whinging cow and told 'it's only polish', let me make it clear that I'm so excited for and extremely proud of Kaz and Ben at Pretty Serious. Its amazing that 100 bottles of one of their polishes sold out so quickly (like Kaz pointed out - last year 300 bottles of Emma Louise took 3 months to sell)  But it's like when people discover your favourite beach, you wish it would go back to when only you knew how awesome it was!

Anyway, moving on.  Today I have some awesome polishes to show you from another fabulous Aussie Indie brand - Glam Polish.

Nickle Nackle - This is is from the Bedtime Stories collection and has neon hot pink hexes, turquoise hexes, purple hexes & micro glitter and rich bright blue holo dots.  The base is a bright light turquoise blue crelly base that held the glitters beautifully.  Application was a breeze and the large glitters were easy to get out of the bottle. This is three thin coats with Seche Vite.


Indigo - Oh how I've lemmed for this one for a while! Fuchsia & turquoise dots and micro glitter in a indigo base with pink shimmer.  For some reason I don't see any of the fuchsia dots on my nails, only in the bottle, I must have just been unlucky on these four fingers.    I love the tone of this purple base, even though it has a pink shimmer, it doesn't lean to a red based purple.  I much prefer blue based purples and this is just perfect to me.  This was three coats with Seche Vite top coat.


Glam Polish is available in Australia through the Big Cartel store and updates through their Facebook page.  International orders can be placed through Mei Mei Signatures in Singapore. 

Wednesday, June 26, 2013

on 5 comments

Watermelon nail art using decals

I'm on a bit of a roll with reviewing products from the Born Pretty Store at the moment, but I've actually found all the products I've tried so far to be very good, which always makes reviewing products much more enjoyable.

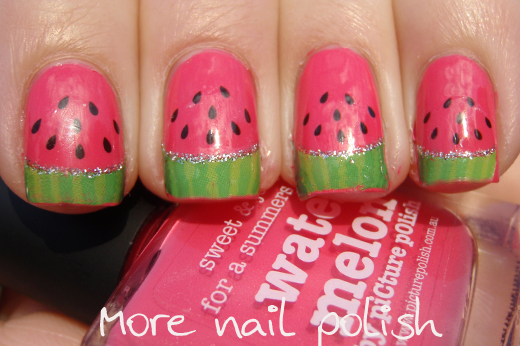
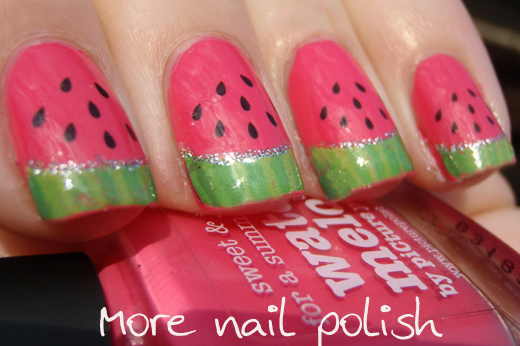
These watermelon nails looked fantastic. I particularly loved how neat the whole design was.  Plus, it would have to be the easiest nail art I've ever created.  This design was created in just two steps.  

Step 1. paint your nails in watermelon pink shade - I chose Picture Polish water melon, because it's the perfect shade and name for this mani.
Step 2. Apply the watermelon water decals to the tip of the nail and coat with top coat. 

These watermelon decals come complete with the two toned green tip, the perfectly shaped and positioned black seed dots and the fine silver glitter french tip line along the smile line.


I did find these decals a lot thicker that other decals I have used.  In fact they were quite stiff even after they were off the backing paper.  Because of that I found they wouldn't lay flat along my nail.  So what I did was roll each individual decal in my fingers to pre-curl it before placing it on my nail with a bit of water.  Once it was positioned in the right place I blot the nail with a tissue to remove all the moisture and then let them air dry for about 10 minutes before putting on top coat.  I did get a bit of shrinkage of the decal using Seche Vite, which pulled it back from the tip of my nails a little bit as can be seen in the photos.

Even though these decals are thicker and stiffer, I didn't find that the edge of the clear decal was visible on my nail anywhere after applying top coat.

This is what you get in the set of decals.  You could get two manis out of it if you did only four fingers on each hand.  I chose to do all ten fingers in the watermelon design rather than using any of the mini designs that have a wedge of watermelon, two black seeds and the words 'water melon' printed in white (which you can't see in these photos).

These decals are available here on the Born Pretty site, and my discount code is MNPG10.

About Me

My photo
I live in Canberra, Australia with my husband, Mr Ten and Miss Eight. My blog is all about nail polish, and a few other bits in between. You can contact me at morenailpolish@iinet.net.au