Tuesday, June 30, 2015

on 3 comments

Dance Legend Malibu - Chumash & Wave Winner

I'm continuing my run on Dance Legend polishes with two shades from the Malibu collection.  

The collection features eight crelly polishes with opaque matte glitters in various shapes and sizes. These are a great take on the milky polish with glitter theme and the formula on both of them was good.  I needed two coats for opacity and one layer of top coat was enough to achieve a good smooth finish.

Chumash - a rich teal base with white diamonds, pink and yellow squares and pink and yellow fine glitters. This is two coats with Seche Vite top coat.


Wave Runner - a soft very pale blue crelly with pink stars and hexes and small blue hexes.  This is two coats with Seche Vite Top coat.


Dance Legend  polishes are available from the Dance Legend website. International shipping is only $10 for up to 10 polishes, but if it's more than 10 polishes then shipping is free!  The website also has details of other international stockists.

Don't forget you can connect with Dance Legend on Facebook and Instagram.

Polishes provided for consideration.

Saturday, June 27, 2015

on 7 comments

Dance Legend Velvet Recharge

Arrgghh, I feel like my vision has turned square! I've been playing minecraft with my two littlies for hours today - so unproductive, but they have had so much fun.  We also went to Costco today. Why is it that we can never leave that place without spending about $500. Seriously! They had an 85" TV there today too. It was massive. Sadly we don't have a spare six and a half grand to drop on a ridiculously sized TV.

For tonight's nails I have a mani I created using two shades from the Dance Legend Velvet Re-charge collection. The Re-charge Velvets consist of 10 pastel shades to accompany the 20 other velvet shades already in the collection.

The two shades I chose were 651 (pastel blue) and 659 (pastel dusty pink).  I created a very soft gradient using these polishes. I have to say that these were some of the best polishes I have ever created a gradient with.  Because they were such delicate light shades I expected them to require lots of dabbing with the sponge to build up the colour, but to my surprise, they only needed two applications from the sponge.  The colour showed up creamily and easily.  

The gradient reminded me of an early morning sunrise here on a cold Canberra morning, so I grabbed my bird plate from Messy Mansion and stamped some black silhouetted birds.  This actually looked like our house about a week ago, where we had more than 30 sulphur crested cockatoos on the bare fruit trees out in the back yard, although the shape of these birds in the stamping is wrong (these look more like kookaburras with their large bills to me).


Now to the swatches of the two shades.  This on is 651.  It is a stunning pastel blue shade that doesn't lean green.  The finish on these polishes is satin. It's not a completely flat matte, as it still has a slight sheen to it.  This is two coats without top coat. Perfection in a bottle.


This is 569 which is a pastel dusty pink shade. I found the formula on this on a little trickier to apply and needed three coats to ensure it was smooth on the nail.  I think I rushed my application creating drag marks through the wet previous coats.  I would therefore recommend waiting a little longer than usual before applying subsequent coats.  This is three coats without top coat.


I love these so much, I want the whole recharge pastel collection.  The range of colours is just divine and they scream spring to me.

Dance Legend  polishes are available from the Dance Legend website. International shipping is only $10 for up to 10 polishes, but if it's more than 10 polishes then shipping is free!  The website also has details of other international stockists.

Don't forget you can connect with Dance Legend on Facebook and Instagram.

Polishes provided for consideration.

Thursday, June 25, 2015

on 3 comments

Never throw out a polish again

Today's post is dedicated to handful of polishes I threw away back in the mid 1990's. If only I'd kept them to be able to bring them back to life.

Back when I first seriously got into nail polish in late 2009 I remember reading a blog post done by Scrangie about restoring a dried out polish using Seche Restore. It blew my mind.  I cringed at all the amazing polishes I had thrown out because they had dried up and become unusable.

Two days ago I was going through my two helmer drawers of Dance Legend polishes and discovered this polish.  This was a beautiful blue polish called River of Time from the smoky collection which I showed here.  This polish was only a year old, so shouldn't have looked like this, but when I picked it up I realized that the lid wasn't on properly.  I figured this would be a perfect time to show you exactly what I learned from Scrangie five years ago.

This bottle is just about totally dry. When laying on it's side the mass doesn't move.  Open the bottle and carefully pull the brush out.


Using the dropper that comes with Seche Restore, fill the polish bottle back up to where it would have it's fill line.


Next, insert a wooden skewer and give the solid a stir.  This part doesn't take long, but you will see very thick lumps of polish sticking to the skewer.  Next I grabbed my tattoo ink mixer and used that in the bottle for about 2 minutes.  I then screwed the lid back on and left it for a day.  The next day I shook the crap out of the bottle for about 3 minutes.  After that, it was a good as new.


You can of course try this with any brand of nail polish thinner (not acetone), but I've only ever done it with Seche Restore, cause it's the bomb!  Just remember that Seche Restore contains Toulene, which is one of the bad '3' that is not found in 3 free polishes.  So if you add this magical chemical, which turns finicky polish into smooth, quick-drying chemical loveliness, just remember that your polish will no longer be 3 free.

Wednesday, June 24, 2015

on 1 comment

LaBomb Mani Bombs review

Mani bombs are the latest nail care craze and tonight I have a review of new Aussie mani bomb brand, LaBomb Mani Bombs.

I'd seen a number of reviews of another mani bomb brand (Forever Polished) and I participated in a Australian group buy to try out the idea for the first time.  My experience with the first mani bomb I tried from Forever Polished actually put me off them a bit.  My big gripe is that the mani bomb I used contained lots of blue iridescent micro fine glitter.  When doing a nail treatment, the last thing I wanted was for my hands to be covered in so much glitter that I then had to scrub my hands to remove, therefore removing all the oils that were soaking into my skin.  I was also disappointed that most of the mani bombs I had ordered were just a crumbly messy in a bag, rather that retaining any form of shape. I understand that they are fragile, and you can expect some breakages, but just getting powder in a bag made me feel like the ratios in the ingredients weren't quite right.

Then I was approached by Aussie brand LaBomb Mani Bombs to sample some of their brand new line.  I loved the idea of a mani bomb, just not the execution of the last brand so much, so I gave it another go.

I received six gorgeous different mani bombs to try.  Each comes in a zip lock bag with a label with all the ingredients on it.


Each of the mani bombs is different in appearance.  Different shapes, candies, shades, oils and scents. They all looked gorgeous and smelled incredible.


Miss Four was very keen to try them out with me, so I let her pick which one we would use first. She chose the Mango Sorbet.


The basic process to follow is to get a glass bowl large enough to place your hands in comfortably, fill it with warm to hot water and then put the mani bomb in the water. It will bubble and fizz as it dissolves leaving lots of melted oils and butter in the water to soak into your hands.  The hot water softens your skin and nails making them more susceptible to the oils and butters.  Soak for between 5-10 minutes and then pat your hands dry with paper towel

It's hard to tell from these photos, as our hands just look wet. But they were actually silky smooth and oiled and so yummy smelling that you wanted to eat your own fingers.


Here is an instavideo of my second La Bomb Mani Bomb, which was Nectarine and Honey.

Finally, here is a naked shot of my nails about 10 minutes are finishing a LaBomb mani bomb and patting my hands dry.  You can see how moisturized they still are.


I love these. They give me the exact feeling I was hoping to get after my first mani bomb trial, which I sadly didn't get.  My hands looked and felt soft and smooth and the smell lingered on them until I washed my nails.  These will definitely become a regular part of my nail care routine.

There are currently 25 different types of mani bombs available from LaBomb Mani Bombs, so you will be sure to find something in a scent that you like. Prices range from $1.80 to $2.20 AUD.  You can also keep up with the latest mani bomb releases on the LaBomb Mani Bombs facebook page.

Product provided for review.

Monday, June 22, 2015

on 7 comments

Dance Legend Hammering Collection

I've gotta admit, Dance Legend is right up there leading the way with amazing new finishes for all us polish addicts to try out. For example, take these polishes from the recent Hammering Collection. The collection gives us a new finish in nail polish, a hammered metallic appearance. I love the hammered finish, and in fact we painted all our balcony balustrades using a charcoal hammered paint, so this was definitely a finish I wanted to try out.

There are six shades in this collection and tonight I have two of the shades to show you.  

Applying the polish is really quite odd to look at. As soon as the brush is out of the bottle you can see it moving and separating into the hammered finish, although this doesn't effect the application at all. 

You get the best hammered finish using just one coat, but because the polish pulls and moves together to form the hammered look, you can end up with hollow pitting. If these were just regular polishes they would be nice one coaters.  Because of the hollow bits I applied two coats.  At two coats the hammered effect isn't as strong as when it's only one coat, but it is rather pretty and very interesting.

I did find that adding top coat seemed to smooth out the hammering a little, however that may be because I was using Seche Vite top coat and that is best used when the base polish is not completely dry.  Perhaps if your nails were mostly dry before applying top coat then the hammered finish would stay stronger.

04 As you wish - this is two coats with no top coat.


02 Creep - this is two coats with no top coat.


What do you think about the hammered metallic finish?  I actually quite like it, particularly in the macro shots.

Dance Legend  polishes are available from the Dance Legend website. International shipping is only $10 for up to 10 polishes, but if it's more than 10 polishes then shipping is free!  The website also has details of other international stockists.

Don't forget you can connect with Dance Legend on Facebook and Instagram.

Polishes provided for consideration.

Sunday, June 21, 2015

on 5 comments

Revitanail nail products review

A few months back I received a nail care package from Revitanail which included a whole range of products, this was such perfect timing as my hands and nails really suffer during the cold winter months. I ride a motorbike to work, and let me tell you, our cold Canberra -5 degree mornings make for painfully cold chilblain affected fingers.  Anything that can give my nails some extra care is worth trying out.

Lets have a quick look of them.  Keratin Strengthening Serum, Whitening Glow, 3D top coat, Triple Strength colour, Ridge filler base coat, instant dry drops and cuticle remover gel.  I've taken a couple of months putting this together so I could really try the products out and give you my thoughts.


Let's start with the cuticle remover gel.  Let me be up front and say that I'm an Orly Cutique girl all the way.  I've used Orly Cutique for the last five years and I didn't think I would ever switch from it. However Revitanail's cuticle remover gel gives it a pretty damn good run for it's money.

The tube applicator makes it a dream to apply along the cuticle end of your nails.  I then just left it on for about 5 minutes and gently pushed back my cuticles.  As you push back the skin on your nails you can see the gel going from clear to a milky appearance. I then washed my hand thoroughly before polishing.  This one is a thumbs up for me.


Whitening Glow.  This one's marketing material says it will instantly transforms yellow brittle nails into beautiful bright ones with White Sapphire and B-White Peptides. Apply 1 coat for a sheer finish and 2 coats for a brighter look.  Ok.  So I applied one coat for a sheer finish as can be seen below. At one coat it is streaky and patchy and not something I would wear.


At two coats it has a white crelly finish.  Think the OPI Ballet sheer polishes.  But it's still a bit patchy.  It would probably be a nice basecoat but for me as a whitening polish to wear on it's own, it's a thumbs down.


Keratin Strengthening Serum - Here is what they say "Revitanail Keratin Strengthening Serum is enriched with Keratin Peptide clinically proven to strengthen, protect and hydrate nails. It is water based formula allowing it act as a protective base coat under polish. DBP, Toluene and Formaldehyde free, the serum can be applied 2-3 times a day or as often as required onto polished or clean nails to leave them nourished, hydrated and protected against daily wear and tear".

I do like this one, but I apologize for my photo here, as showing a milky white liquid on my nails like this is something I should have thought about a little more.  Anyway, I like that you can apply this onto both clean nails or polished nails and my nails certainly do feel more nourished and hydrated after applying.  This one is a thumbs up.


Ridge filler. This ridge-filling treatment claims to even out the ridges of the nails and give nails a smooth and uniform surface, ensuring the polish goes on easily and evenly.

I like this one a lot too, and I've been using it a lot.  I have pretty much been only using this as my base coat for the last few months.  I used to use Nailtek Foundation II ridge filling base coat, but ran out of that about 6 months ago, and never got around to ordering any more cause I have to buy it online. However this one I can get at Priceline so I'm pretty sure I will be keeping up with it.  I love that it has a satin finish and I do feel like I hides any ridges on my nails (although I do give my nails a very light buff to keep them mostly smooth).  Thumbs up.


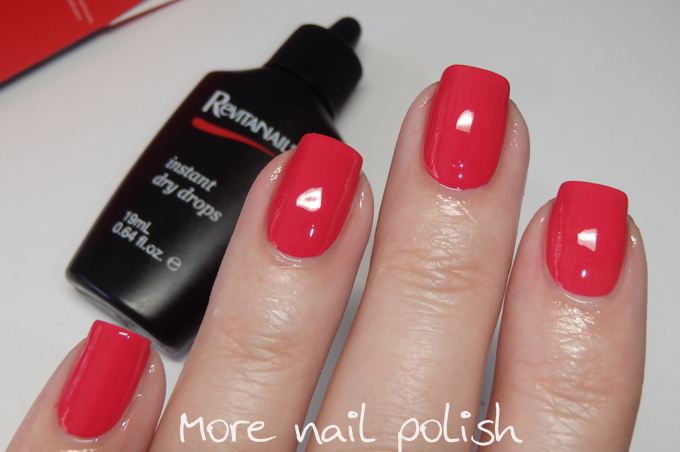
Triple Strength lacquer in Pomegranate and 3D top coat.  Not really my kinda colour, put it sure packs a punch.  Nice formula and nearly a one coater.  This is two coats plus the 3D top coat.  Love the 3D top coat too, especially over glitters.  It does a great job at hiding texture, especially when combined with a quick drying top coat.


Finally, instant dry drops. I've always been intrigued by instant dry drops and wondered if they really worked.  On top of my pomegranate mani, I added one drop to each nail. It seemed very oily and made my nails really glossy, but I was actually to scared to push on top of a nail to see if they were dry.  They certainly seemed to dry quickly, but whether they dried any faster than just using a quick dry top coat like Seche Vite I don't know.

The only way to really test that out would be to do a dent test - which I just don't have time for at the moment.  But if I'm in a super rush to get out the door, then I sure am going to add both quick dry top coat and some of these drops and I think that would be about the best you can do to dry your nails fast.


Revitanail products are available Australia wide at Priceline, Coles, and selected pharmacies.  For more information see the Revitanail Facebook page.

Products provided for review.

Friday, June 19, 2015

on 2 comments

Dance Legend Sahara Crystal Metal

Dance Legend have a massive range of textured polishes, 54 of them in the Sahara collection at the last count I did, plus a few others in the Anna Gorelova collections.  While they are all textured finishes, there is quite a range in the appearance of some of them. Some are textured shimmers, some are textured cremes, some are textured glitters, there are even some textured holos like Gamayun from the Anna Gorelova winter collection.  The most recent six additions to the Sahara line are textured metallics. These are stunning shiny and sparkly metallics, not like that nasty business that China Glaze released with those crinkle chromes.

I have two of the six shades to show you.  The other four are more classic metallic colour, in silver, gold and copper tones, but I chose the two blue shades as I thought they would compliment each other nicely.

First up is Nickel, it has a pale light blue base with a strong gold sparkle.  It's hard to tell with the textured finish, what is making this so sparkly, whether it's glass flecks or glitter, but if it is glitter then it's very shiny.  This one dried to a nice sparkly matte finish with a rough textured feel.  Dry time was ok. Not super fast as you can't add a top coat, but it covers in two coats so you don't have to wait too long.


Next up is Zirconium, which is a darker blue.  This does doesn't seem quite as textured as Nickel and it hasn't have the same flat matte finish, it's more metallic.  It is still very sparkly, but doesn't have a gold shimmer.  Again dry time was ok and consistent for a textured polish.  This is two coats on it's own.


I ended up wearing these two polishes are a textured gradient and then stamped.  I love using textured polishes in gradients, because the sponging really accentuates the textured finish and shows off the sparkly bits to the max.  

Stamping over textured polishes is weird, because it seems odd not to apply a top coat over the stamping to seal it all in.  Here I stamped using Mundo de Unas white polish, and I really didn't think the stamping would last without top coat. But it must be something to do with the textured base, because the stamping lasted all day.  Please don't ask me what stamping plate this was, cause I can't remember and I didn't write it down.  


Dance Legend  polishes are available from the Dance Legend website. International shipping is only $10 for up to 10 polishes, but if it's more than 10 polishes then shipping is free!  The website also has details of other international stockists.

Don't forget you can connect with Dance Legend on Facebook and Instagram.

Polishes provided for consideration.

About Me

My photo
I live in Canberra, Australia with my husband, Mr Ten and Miss Eight. My blog is all about nail polish, and a few other bits in between. You can contact me at morenailpolish@iinet.net.au