Wednesday, July 30, 2014

on 9 comments

Black Lace with Messy Mansion MM44

OK, I think I like this one even more than the white one!  It's basically the identical design but in black.

For the base I mixed up a black jelly tint by adding about 4-5 drops of black polish to some clear polish in a mini bottle.  I applied two coats of that jelly tint and I actually thought it was going to be too dark, but as you can see, it hardly looks like there is any tint to the base now that that the design is finished.

I stamped using Mundo de Unas Black polish and outlined my nails with regular black polish.  The red rhinestones are SS05 Swarovski crystals.  The lace design is from Messy Mansion plate MM44,.


Tuesday, July 29, 2014

on 9 comments

White Lace with Messy Mansion MM44

Ah, that age old question - Are you a white lace or black lace gal?  Tonight I'm white lace.

In my opinion, the best lace stamping plate is Messy Mansion's MM44. It's perfectly etched and has so many different lacy designs to choose from.

For this mani I started with a base of OPI Don't Touch My Tutu (although I suspect my bottle is fake, as I bought it from the same proven dodgy local retailer.)  I then stamped with Mundo de Unas white polish and outlined my nails with white polish.  Finished with silver SS05 Swarovski Crystals in the centre of each lace flower.


In other stamping news, do you want one of those super squishy marshmallow stampers? Well Messy Mansion have you covered.  They have just released a set of 10 stampers, they come in sets of two, a light and a dark colour, and in five different softnesses.  Despite the fact that Julia from Messy Mansion only lives just outside of town, we haven't been able to organise a met up for any time soon, so when I purchased my complete set, I paid for postage across town.  I'm hoping it will be here really soon so I can do a review and show you all.

Monday, July 28, 2014

on 3 comments

Scratch nail wraps - Zodiac Collection - Pisces

Have you heard of Scratch nail wraps? I've recently seen a few of the designs popping up on Instagram, and then I got the opportunity to select a set to review.  There were lots of designs that really appealed to me on Scratch website, but I ended up settling on the Pisces design from their Zodiac Collection.  They are releasing a new star sign as the year goes by, and they just released Leo.  OMG I love the combo of colours and designs on Leo, I think I might have to buy a set of those.

Scratch nail wraps came from the idea that nail wraps are really cool but most of the designs currently out there are not. They work with a range of creative designers to come up with unique and interesting nail wrap designs.  The main thing I noticed across many of the designs that sets them apart from other brands, is the variety of designs in each pack.  They are not just sets of the same design for every nail. 

Each set of Scratch nail wraps comes in a set of 16 wraps in total, packaged with a small black nail file and an orange stick.  I do love that these nail wraps are extra long.  I was easily able to use both ends of the wrap, which meant I was able to complete my full mani and use up only 5/16 of the wraps.

I love how sharp and clean all the black lines are, it's an effect that is really difficult to recreate using stamping decals or freehand.  That's when I really think nail wraps come into their own. I don't get excited by wraps that have prints that can be easily created with stamping, especially two tone designs. But ones like this make nail wraps totally worth it.

I also love nail wraps for their quick application with an amazing finish.  I was able to apply all ten of these within 15-20mins. If I tried to recreated this with stamping and freehand, I would have been here for hours.

The colours in this design are really striking and bold. Love them!


Scratch Nail Wraps are available from their store. Follow them on Facebook for announcements and offers.
 
Wraps provided for review.

Sunday, July 27, 2014

on 4 comments

Colour blocking

I created this colour block mani some time last week and while I really loved it on my nails, my photos don't have the same wow factor because the day light was so dark and gloomy.

I used a stamp for the colour blocking, it was one of the Moyou London plates, but I don't remember which one. I could get up from the computer and have a look, but I have a kitty curled up in a ball on my lap, and I can't disturb her!

The blue polish is a frankenpolish that I created about three and a half years ago.  I made by mixing in TKB Ultramarine Blue pigment into a white polish.  I absolutely love the colour, and because I mixed it myself it's super pigmented. and covers in just one coat.

The great big crystals are Swarovski red ones in size SS16.


Saturday, July 26, 2014

on 5 comments

Rage with Swarovski crystals

Orly Rage is such a gorgeous rose gold foil that I can't help but pull it out from time to time and put it on.  The Orly Foil FX range were the first Orly polishes that I ever purchased more than four years ago, and I have gone through an entire bottle of Luxe in that time.

Following from my discovery that Swarovski crystals are just incomparable for nail art, I splurged on myself and purchased some mixed colour bags in another four sizes!  But I figured it was a good investment, because unlike the cheap acrylic crystals, these can be cleaned up in some acetone and they look like brand new and can be reused over and over again.  So yes, they are more expensive, but you never throw them away, which means the investment lasts a lifetime.


Friday, July 25, 2014

on 2 comments

Butterfly full nail water decals

I showed a sneak peak of this mani when I shared my tip about using a false nail to trace around to get a neat cuticle edge with full nail water decals. Here are the full shots.

These full nail water decals are from the Born Pretty store. They come in a sheet designed to cover all ten nails, but I have to say the sheets are only wide enough to do about four and a half nails on each hand.  As you can see on my pinky, I have to cut an extra strip from the bottom of the nail and put it up the side so you don't see a stripe of white polish.

These water decals also have some fine gold glitter applied over the bodies of the butterflies, which is a nice touch.  

Normally I do designs like this with a holo base, and while I do like the clean white base, I still prefer how a silver holo base makes these pop in the sun light.


Thursday, July 24, 2014

on 9 comments

Circular gradient and stamping with Lily Anna Plate

Happy Wednesday everyone.   How is your week going?  I'm tired.  My team and I are all so busy at work, busting our buts to deliver on a bunch of projects that are all due right now (or actually a few weeks ago).  I have to say that I really enjoy my nail polishing hours in the evening as my way of unwinding and giving my brain a chance to recover.

Today's mani is one that just happened without me really concentrating on it, and I love it so much.

I created a circular gradient using Ulta3 Honolulu, Picture Polish Instinct and Ulta3 Blue Marlin.  I did the gradient over a white base, which really made the colours pop, and then I stamped using Mundo de Unas Black polish and Lily Anna 03 plate.


Wednesday, July 23, 2014

on 3 comments

Face of Australia - Dark Side collection swatches and review - Part 2

Here is part two one of my swatches of the Face of Australia Dark Side Collection. 

Just to recap, the nail art on the feature nail is part printed water decal and part acrylic paint.  I generally coloured the design in to make it pop, except for any fine facial features which I just left as the printout.

Darth Vader - an interesting mix of purple and bronze hex glitters and fine matte black glitters in a clear base.  This is two thin wiped coats of Darth Vadar over Ursula, so as you can see the glitter payoff is pretty good.  Nice to see an Aussie brand coming up with some unique glitter combos.


Magneto - how awesome is it that this Australian drug store brand has come out with this metallic and shiny duochrome polish at this price point. The colour reminds me of Butter London Knackered, minus the holo glitter (and the $20 price tag) because it has the same pretty green to purple duochrome shift. The I did three thin coats here. I like that it's not too brush stroky either.


Maleficent - a very blackened plum jelly creme.  Even in full sun you can only just see that the polish has a deep plum colour, therefore in most lighting this one does look black.  The jelly creme finish means you need to do three thin or two thick coats to ensure you don't see any patches, but dry time is good and the polish flows freely onto the nail.  This is three coats with top coat.


Voldemort -  another glitter topper.  This one has three sizes of matte aqua and black hexes.  This is two thin wiped coats shown over Mystique. Again the glitter payoff was really good.  This polish seems to have the perfect undies in Mystique from the collection too. I really loved this combo.


Both the glitter polishes dry a little bumpy due to the thickness of the matte glitters, but at least they aren't curling.  I used one layer of top coat for these photos, but if wearing them in a full mani I would wear two layers of top coat to get a glassy smooth finish.

The Face of Australia Dark Side collection is available from selected Priceline Pharmacy, Big W stores and online at Fashion Addict
Polishes provided for consideration.

Tuesday, July 22, 2014

on 2 comments

Face of Australia - Dark Side collection swatches and review - Part 1

I have part one of my swatches of the Face of Australia Dark Side Collection to show you tonight.  Plus I get to show you the first four nail art designs I created on false nails to feature with each colour.

With all of the feature nails, I printed them onto water decal paper and then tried something new with them.  Because all of the polishes in this collection are very dark shades, I knew that anything I printed onto a water decal would show up at all.  After I printed them I intensified many of the colours on the decals by painting over them with acrylic paint.  I didn't paint over any of the fine features, like on the face, as I couldn't get by brush lines fine enough.  This also means that some of the faces are a little 'dotty' when my printer didn't print the decals very well - I was running low on coloured ink and I think that may have affected the quality.

Once the acrylic paint was dry, I soaked them and slid them off the water decal backing paper and turned them upside down onto a piece of regular paper.  I then, very carefully, painted the underside of the water decal with white acrylic paint.  This provided a nice contrasting background for each of the decals to show the printed details.  I then stuck them onto the nail using a layer of top coat.

I'm so happy with how they turned out, and I don't think you would even notice they are false feature nails if I didn't tell you :)

Jafar - a very dark oxblood jelly creme.  The jelly-ish finish does mean you need either two thick coats, or three thin coats like I've done here.  My photos are taken in the full sun. This shows off the base colour perfectly, but it also makes the polishes appear lighter than they are.  This whole collection is very dark, and in most conditions this one looks nearly black.


Mystique - a rich and intense dark teal creme.  The finish isn't a jelly on this one and you can get away with two coats.  This is my one of my favourite colours in the collection (together with the next two), but probably my least favorite water decal.  The fine details of mystique just didn't come through, although she really does seem to blend in with the colour, and given her real life ability to transform, this was pretty cool.


Ursula - this is the perfect shade for Ursula, the horrid fat sea witch from the little mermaid.  I just love this colour, it's so intense and rich, almost royal looking.  Nicely opaque at two coats.


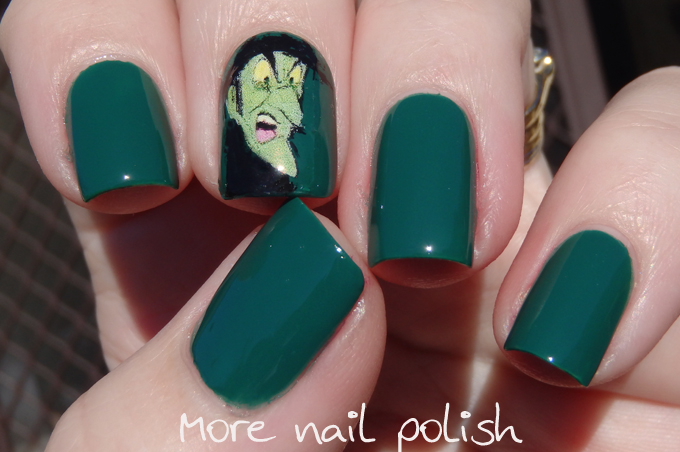
Wicked Witch of the West - a dark green creme that looks great at two coats.  I can never have enough shades of green cremes, and this dark forest green is really flattering and the sort of green shade that anyone can get away with wearing.


I'll have the other four shades for you tomorrow night.

The Face of Australia Dark Side collection is available from selected Priceline Pharmacy, Big W stores and online at Fashion Addict

Polishes provided for consideration.

About Me

My photo
I live in Canberra, Australia with my husband, Mr Ten and Miss Eight. My blog is all about nail polish, and a few other bits in between. You can contact me at morenailpolish@iinet.net.au