Sunday, August 31, 2014

on 5 comments

Femme Fatale Cosmetics - Halloween Duo

I have two new glitters polishes from Femme Fatale Cosmetics to show you tonight.  This duo of polishes, released for Halloween, is released tomorrow.

Time for Slime - This one is a bright lime leaning yellow.  It has white, yellow and iridescent glitters in a bright yellow jelly base.  This is too sheer to wear on it's own, so you will want to layer it over something.  It looks awesome over both white and black, over white you see the yellow glow, but over black you really see the iridescent glitters.  I really want to try this over a darkish blue, as the yellow base will make a gorgeous teal colour with glowy glitters.  This is two coats over white and black with Seche Vite top coat.


Witching Grimoire - This is a complex mix of pink, red and maroon glitters ranging from tiny micro glitters up to very large hexes, holo circles, tiny stars, moons and bar glitters.  Considering the range of different shaped glitters, that wasn't actually that difficult to get on, or to smooth out.  Because of the mix of glitters, it would probably be best layered over a base, but I did three thin coat to show you it on it's own.  Topped with one layer of Seche Vite.

I didn't know what a Witching Grimoire was, so I Googled it. I'm guessing Sophie from FF is a bit of a World of War craft gamer.  I've not got into any of these games, although I know I would love playing them as I've seen how much my mum loves playing Ever-Quest, Landmark and a bit of WoW.  She has even got my kids into playing Ever-Quest with her assistance.  I've seen them flying around on pegasuses, and they refer to it as 'playing the horsey game'.


The Femme Fatale Halloween duo will be on sale tomorrow from Femme Fatale Cosmetics.

Saturday, August 30, 2014

on 4 comments

Pink, purple and yellow water marble

Now that I've sorted out my issues with getting the nail polish to spread for a water marble, I've started to play around with the various patterns I've seen around the place.  I really like this pattern and it's so easy to draw in the water when you polish is behaving its self.

I wish there was some decent sunlight the day I wore this one, because the colours were so bright and vivid.  I have to say, I found it hard to limit myself to just three colours for this water marble, I really wanted to add more colours in, but then all I would create would be rainbow marbles and that would get a bit boring.


on 11 comments

31 Day Nail Art Challenge starts this Monday

Last year I had such a blast participating in the 31 Day Challenge during September, that there was no way I was going miss the group effort again this year.  At it all starts in just two days time.

If you don't know what the 31 Day Challenge is all about, jump on over the Chalkboard Nails to read her FAQ and grab one of the challenge schedules.


While there isn't an official inLinkz (everyone should use the tag #31DC2014), last year I set up a daily inLinkz for anyone that wanted to share their 31 Day Challenge work. The inLinkz tool has also been updated to be able to share your Instagram photos too.  Once again I've set up inLinkz for every day of the challenge. I'll have each inlinkz in my daily blog posts, so if you want me to check out your nail art, make sure you add it to the list everyday.

I hope at least as many people join in this year as there were last year, it was amazing, and Sarah has done a great job at getting us all involved together at the same time.

Will you be joining in?

Friday, August 29, 2014

on 8 comments

New Picture Polish Shades Bette, Eyre and Grace

With Picture Polish blog fest over for another year, I wanted to share full swatches of the two shades I featured in my nail art.  Plus my swatches of the other new release Eyre. Oh, and some comparisons to the original Ozotic versions too.

Bette -  a medium blue with scattered holographic finish.  A re-release of Ozotic 617.  Nice formula, and builds to opacity at three coats.


Comparison shots with Ozotic Pro in round bottle, next generation Ozotic in square bottle and Bette by Picture Polish.


I'm confident to say these are all dupes.  If you missed Ozotic 617, then Bette is your best bet.


Eyre - a royal blue chrome finish with slight purple duochrome and plenty of scattered holo particles. A re-release of Ozotic scatter chrome 913.


This Ozotic was only ever released in the square bottles, so here are both bottles. Once again, as described by Picture Polish, these are dupes/re-releases.


Grace - a very pale pink scattered holo. Opaque at three coats.  The particles seem finer in this polish compared to the previous two, but that might be more due to it's slightly crelly finish rather than jelly.  The macro certainly shows the holo flecks well.  This one is a re-release of Ozotic 607.


Comparison of original style Ozoitc Pro 607 (actually that's not entirely correct, because there was another shape before this that was available in around Y2K) Square Ozotic 607 and PP Grace.


Grace is not a perfect dupe of either version of Ozotic 607, and Picture Polish did say this on their facebook page when they first released bottle photos.  Grace is slightly paler and the holo particles are definitely smaller than the Square Ozotic, and both the Square Ozotic and Grace have significantly different holo appearance to the original 607 (which I purchased pre-Picture Polish days)


I have already shared swatches of Picture Polish Pandora during blog fest, but here it is one more time before the comparison swatches.


Comparison with Ozotic pro round, Ozotic square and Picture Polish pandora.


These three shades = dupes.


Thanks for stopping by.

Thursday, August 28, 2014

on 13 comments

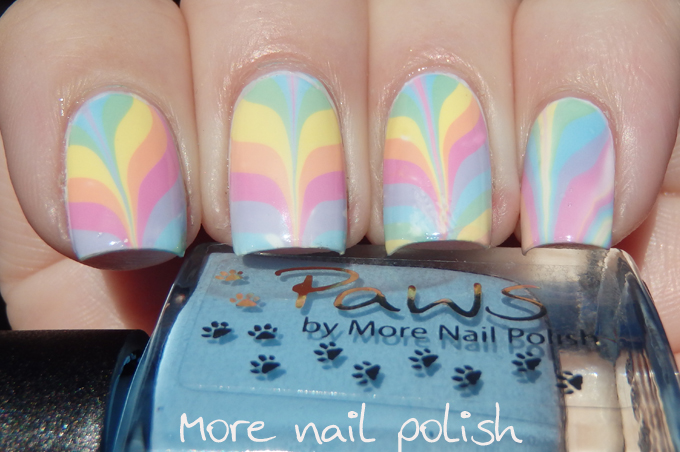
Pastel rainbow water marble with some tips and tricks

Not satisfied with my rainbow bright shades of water marbling polishes, I mixed myself up a collection of pastel water marbling polishes too.

I messed the tip of my ring finger by just being clumsy, and again trying to save time by doing two nails into the bullseye at one time.  That's it, I'm not going to do that again.  I really love these pastel shades, they are all roughly the same tone of colour which makes then such a lovely collection.


Now there are lots and lots of water marbling tutorials and videos out there (trust me, because I've watched and read just about all of them) But here are some additional things I learned that I aren't mentioned very often, and they might help you if you are struggling with water marbling.

The number one issue most people talk about is the polish not spreading.  Yep, this was exactly my issue.  First up, you have to use the right polishes.  That is the most important thing.  The the polishes don't spread you will never get a good bullseye. As I don't have a lot of experience with brands of polish that work well, I suggest you google that one.  One thing I've found is that not all polishes from a particular brand will work. All I can recommend is to try different polishes and brands to see what works for you, also, look at other watermarble nail art and see what polishes they used.

Water at room temperature is important.  It hasn't mattered to me whether is was filtered or not, I just use tap water and ensure its not too hot or cold.

If your first drop doesn't spread in a nice circle (example below), grab a toothpick and run it around the edge of the cup, this makes the polish spread further to the edge.


Don't let that first drop dry out, if it drys out then the second drop will never spread  Make sure there isn't a heater or fan blowing where you are working and drop the first few polishes fast.  I even recommend dropping the first colour 3 times straight after each other.  This makes the first ring thicker and less likely to dry out before switching to your other colours.  


When you start dragging your design, don't touch the three outermost rings.  I used to try to drag from the very outside, and that would end up dragging some dry polish across and ruining the whole thing.  Start three or four rings in and stop three or four rings before the end on the other side (if draging through and not stopping in the middle)


Because I did this bullseye for these photos, I had to put my finger in to see the end result.


I seriously love my Paws water marbling polishes so much!


Between bullseyes, clean the top of your water.  If it's not clean, your first drop will not spread out at all.  Usually the water has lots of very fine bits of polish floating on it from where you cleaned up the top of the water before you took your nail out. 


The way I clean the water is to put a drop of Seche Vite on it.  I then run my toothpick around the edge of the cup until you can see the Seche Vite has spread out totally to the edge.  The Seche Vite will dry fast and look wrinkly on the water, it will also contract inwards pulling the floaties with it.


When you slide the Seche Vite out of the water in one large sheet, it takes all the floaties away.


My cleaned up sample nail.


I hope these tips help you little bit, but if you have any more questions, please ask them below and I will answer them tomorrow night with another water marble post.

About Me

My photo
I live in Canberra, Australia with my husband, Mr Ten and Miss Eight. My blog is all about nail polish, and a few other bits in between. You can contact me at morenailpolish@iinet.net.au