A few weeks back I received an unexpected, beautifully presented package in the mail from Jamberry. Don't freak out, I'm not becoming a consultant, but I am still a firm believer that there is a market for good quality nail wraps which can bring nail art to people that for whatever reason, can't do nail art.
I've tried Jamberry wraps before and the truth was I actually found them really excellent. I've even worn a few more that I'm yet to blog about. They always apply neatly and smoothly, they last well and they remove cleanly without any damage to my nails (unlike those nasty NCLA ones I tried last week).
This package arrived with the official Jamberry heater. What a difference this made, not so much to the application of my wraps, but to my comfort as I applied them. My previous experience was standing in the kitchen next to the toaster and warming up each wrap over the element. This time I was able to sit comfortably and have this mini blow heater gently warm my wraps and fingers. I also received a little manicure kit that provides all the tools to get a perfect Jamicure.
Of course the package also included all four of the new nail wraps designed by fellow Australian blogger So Nailicious. The Geo French Twist design, with black and gold was by far my favourite and the one that I chose to put on. The other three wraps are exactly the same design in other colour combinations.
I really like the design that Maria created, it's funky and chic and it is most definitely true to her style. But I would love to have seen four different designs, rather that four colours of the same design. Gosh, I can think of so many designs I'd love to see on a set of Jamberry's it not funny!
Jamberry products provided for consideration.
Showing posts with label Nail Strips. Show all posts
Wednesday, July 27, 2016
Saturday, July 23, 2016
Nail art ideas with nude polish and colours - NCLA wraps
This weeks 40 great nail art ideas challenge theme is nude + colour and my personal prompt was tribal. By total coincidence, I've had these NCLA nail wraps in my drawer for at least 2-3 years, and given that they matched the theme, I figured this was as good a time as any to put them on. Yes, I know it's not 'nail art' and may be considered a 'cheat' for the challenge, but hey, I haven't missed a single week so far and these were too perfect for the prompt.
This is the first time I've used NCLA nail wraps, they have some gorgeous galaxy ones that I've been eyeing off, but after this experience I don't think I will bother. Application was great, very easy to apply and over and done with for all ten nails in about 30 minutes. The wraps are pliable yet strong, so you can peel the off and reposition them without them breaking. The instructions say to apply a layer of base coat before applying the wraps. So I did.
The reason I wont be using these every again is because they torn the shit out of my nails when I removed them. The instructions say to just peel them off, which I assume is because you have a base coat on that they wont wreck your nails. Not so for me. I got little splinters of nail peel up when I tried to remove these, and the only way to get rid of them was to buff my nails. These are also made of some sort of vinyl, so they don't dissolve very easily using acetone either. I did lots of rubbing with acetone and gentle peeling with tweezers to eventually get them off. Removal definitely took longer than application.
So, whilst these were nice whilst I worn them, I'm not a fan anymore.
Monday, October 5, 2015
Jamberry nail wraps - review, swatches and wear test
Alrighty, I have a lot in today's post, so apologies that its a long one.
Today I have some swatches, a wear test and my review of Jamberry nail wraps. First I'm going to talk about the product themselves, how they applied and wore, then I'll get into some of the other Jamberry business!
Jamberry just launched here in Australia on 1 October, and as such, I have been inundated by emails from consultants offering to send me some samples to review, and seeing if I was interested in becoming a Jamberry consultant. The simple fact is that no, I'm not interested in becoming a consultant and never will be. I have an excellent, high paying, secure job that I really love so I have no need to earn a little extra on the side, nor do I need to rely on nail wraps to have pretty awesome nails every day. But that doesn't mean I don't see the market for nail wraps. There absolutely is, and I can see why it would work really well as a party plan product.
Anyway, I replied to one of the consultants who emailed me, and she really was lovely. She sent me a small pack to try out. There were 12 different sample wraps, a full pedicure set (not shown in photo below), an alcohol prep pad and instructions.
The first wrap I applied was the Burberry pattern (shown during the 31 Day Challenge), which I was able to cut in half and apply one half to each nail. My nails are at the longest I like to wear them, and there was plenty of wrap left at the tip of each finger, so unless you have really, really long nails, then you would easily get two nails out of each wrap.
The problem I had was that the sample wraps area really narrow, like REALLY narrow. The first few designs (eg pink quatrefoil, black and white flowers, blue snake skin and beige gradient) were even too narrow for my pinky finger. The floral design is very narrow, but I tried it below on my ring finger. The burberry design and the two bottom designs were the only ones that would fit a middle finger, and as you can see below, they left a massive gap on each side of my nail.
Argh - look at that massive gap on the sides of my nails.
I emailed the consultant who sent me these and she said that these are just samples, and the full manicure sets do come with a much larger range of sizes. But you'll just have to take her word for it, as I haven't tried a full set.
Now for application. Jamberry wraps require heat to activate the glue that adheres them to your nail, very much like the minx nails I tried during the 31 day challenge. Consultants have little heater fans that they use and sell for applying Jamberry wraps, but I didn't have one of those, so I made do with something every house has, a toaster! I held my wrap with tweezers about 10 cm above the top of the toaster whilst it was pushed down. The wrap was quite stiff to start with, but then I could see it wilt before my eyes and I could tell it was softened and ready to apply.
Once it was soft and pliable, I applied it to my nail. They are nice and strong so you can re-position it if you put it in the wrong place, but if you take too long the wrap will start to harden again. If that happens just hold your fingers over the toaster to warm them up again. If your wrap is nice an warm then application is a breeze. You can pull them smooth and easily get them on without any wrinkles. I have a very strong 'c' curve to my nails, so I was glad to see them applied so smoothly. If you're not able to apply the wraps smoothly, then it's highly likely they didn't warm up enough to soften and stretch, or they cooled and hardened as you applied them, at least that was my experience.
Here is the second mani I created using the flower design. Again, this wrap was way too narrow for my nails, and I don't consider myself to have wide nails at all.
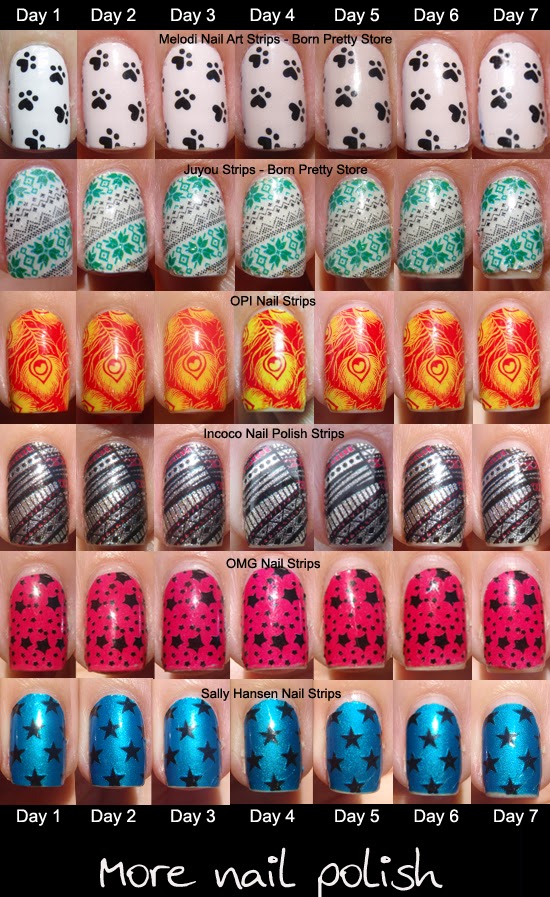
I kept the Burberry design on my right hand for a whole week to fully test out the wear. I was very happy with the wear. I'm a full time working, busy mum of two children, so my hands get a good workout. I even did gardening the week I wore these (with gloves on of course!). Below is my running comparison of how the Jamberry nail wraps compared to other nail wraps that I have tried.
As you can see, wear was good, but by day 7, they were just starting to lift at the corners on the tip. They are certainly comparable to other well known brands like Sally Hansen, Incoco and OPI.
Removal was very easy too. I just held my nails over the toaster again until my fingers felt warm, and then I used tweezers to grab the edge of the wrap and easily peel it off. No residue was left of my nail, but just I gave it a clean with polish remover anyway.
Now for my price comparison. Rather than price per wrap, I'm comparing them on price per full 10 finger manicure.
- Jamberry AUD$22 for 18 strips $1.22 per strip, but you get two full manis per box (+two full pedicures), so $11 per mani and less if you consider the pedi's.
- Sally Hansen AUD $14.95 for 16 strips (Australian price at Target), can be found cheaper online - $1.07 per strip but only one full mani per box, so $14.95 per mani.
- OMG Nail Strips USD$7.99 for 14 strips (online price & cheaper if bundled) 57c per strip, but only one full mani per box, so $7.99 per mani.
- Incoco USD$8.99 for 16 strips (online price) 56c per strip, but only one full mani per box, so $8.99 per mani.
Another plus for me is that these don't dry out once they are open, unlike Sally Hansen, Incoco and OPI. The OMG strips and ones from the Born Pretty store didn't dry out either, and to me this is so important if you want to be able to wear them lots of times as feature nails etc.
I also really like the range of Jamberry nail wraps, there are some gorgeous designs I'd love to wear, but instead I'll just drawn inspiration from them and create them with polish, stamping, vinyls or free hand.
Ok, so now that I've talked about the product, let's talk about the business.
From what I understand, a Jamberry consultant is similar to being a consultant for any other multi level marketing (MLM) business. Consultants are signed up 'under' other consultants. Some MLM companies work really well and have built really good names for themselves, like Avon and Tupperware. But sadly, I came to know of Jamberry because of numerous negative reports through the nail world. Let me tell you about the ones I know of.
The most recent has been the reproduction of PiggieLuv's autumn leaves design by a Jamberry consultant who said they came up with the design herself. Here is the Jamberry version. It's not so much that the design was copied without credit (although it is credited now), but the fact that Narami's copyrighted photographs of her manicure were used to advertise the Jamberry wrap.
That was the the most recent issue, previous to this I have seen Jamberry consultants running online competitions inviting participants to upload the worst nail art they can find on the internet and the person who finds the worst picture wins.
I've also seen comments from Jamberry consultants against Instagram photos suggesting that the nail artist try Jamberry wraps instead. Oh sure, they don't actually say that the nail art is no good in the comment, but they may as well have said, your nail art is shit, you should try these cause they'll be so much better.
The common thing I've noticed here is that it's all the consultants doing this. What this tells me is that Jamberry mustn't be training their consultants in general online etiquette, and if they do, then they are teaching them some very odd practices!
So with Jamberry launching here in Australia this week, I can guarantee that there will be lots of new online party requests and comments about Jamberry in various Facebook groups, I've already seen about 5 this week. You just need to check out the Jamberry Australia Facebook page to see the number of consultants already signed up that have received their starter package.
I'm now talking to all those new Australian consultants, please don't be dicks! Don't insult people. Be personally creative when designing nail wraps. Don't push your product so hard that you piss off all your friends and family. From what I've sampled, the product is good and there are lots of designs available. Let the product sell itself.
But, if anyone is interested, you can contact the lady who sent me these wraps (I get no kick back here other than the samples seen above) who can help you with wraps or becoming a consultant if you so wish.
Wow, that was a long one!
Sunday, February 22, 2015
OMG Nail Polish Strips Party Pack Giveaway
I have previously done a review on OMG nail polish strips and also shown a wear test with a comparison to other nail polish strip brands. I have three more swatches to show you today and also a chance to win an amazing 10 Guest Nail Polish Strip Party Pack valued at $50.
Before I get into the swatches, let me tell you about the Nail Party Packs.
The idea is that you arrange your own OMGnail party, you decide how many people to invite and select a package based on your expected turnout. You get to choose the designs you want and the packages
comes with a nail file and orange stick for each guest, as well as invitations, a catalog and order forms.
Unlike some other nail polish strip party's where guests get to have a one finger trial of a strip, each guest will get a full set of strips to apply for a complete mani. At the end of the party, your guests can place their orders with you for which nail strip designs they want to order and you do all the orders through the OMG nail polish strips website using your custom 50% off coupon code. You can actually charge what ever you like for the strips at your party - leaving it up to you how much markup you want to put on top of your wholesale price. Then all your strips are shipped out to you (with fee postage!) to then distribute to those at your party.
You are able to purchase Party Packs through the OMG nail polish strips website. The 10 guest party pack is $49.99 and the 15 guest pack party is $74.99.
Blue Bubbles
Jelly Bean
Lizard
I played with the Lizard design by adding some chevron stamping. I love how it completely changes the look of the whole mani.
Would you like to hold your own OMG Nail Strips party with your girlfriends at absolutely no cost? If so, then enter my giveaway for a chance to win a 10 guest party pack of OMG nail strips.
To enter, I just want to know which is your favourite nail polish strip design. The prize will be shipped directly from OMG Nail Strips. See Rafflecopter widget for full conditions.
a Rafflecopter giveaway
Nail strips provided for review. Giveaway sponsored by OMG Nail Strips
Friday, May 2, 2014
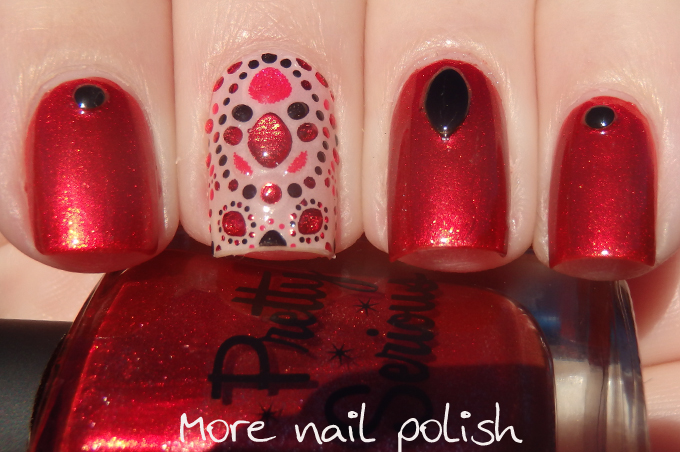
Revlon Marchesa nail wrap - Evening Garnet with Pretty Serious Santas Sunburn
After wearing the Revlon Marches Gilded Mosaic wrap mani earlier this week, I couldn't contain my excitement to try the other wrap that @katherinelb12 gave me - Evening Garnet.
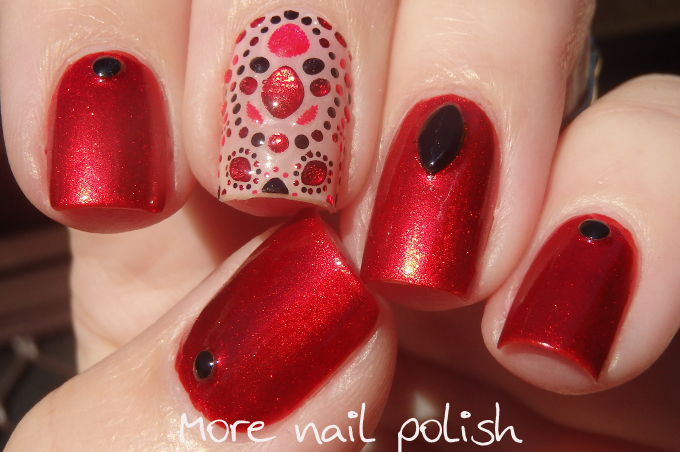
The Evening Garnet wrap has a very pale pink base and textured dotted jewels in circular patterns. The jewels are red, black and pink and the red ones sparkle insanely.
I chose to match the wrap with Pretty Serious Santa's Sunburn - which is quite probably my all time favourite red metallic polish. If you don't own it, then your only option to get it now is via blog sales or other private swaps, as sadly this polish was discontinued by Pretty Serious this week and is now sold out.
I don't tend to wear red polish very often, but when I do it somehow empowers me with a stronger confidence.
Wednesday, April 30, 2014
Revlon Marchesa nail wrap - Gilded Mosaic with aEngland Holy Grail
A couple of weeks back I noticed and commented on a photo on Instragram from @katherinelb12. She was wearing a gorgeous gold encrusted nail wrap that looked amazing. She said she found them cheap at our local price line and they were Revlon Marchesa nail wraps. Then she asked if I would like to try them. I thought about that for about a millisecond and then suggested we catch up. Kat lives in the same suburb as me, so we arranged a coffee catch up to talk about nails.
Nearly three hours of nail talk later, I was back home and ready to play with the nail wraps that Kat very generously gave me. She gave me half of this set, as well as half of the Evening Garnet set. We are planning some bestie twin nails very soon with those ones.
These nail wraps are called Gilded Mosaic and they feature textured dots is various shades of gold and pewter on a dark blackened brown base. These nail wraps don't dry out, so I decided to just use three wraps for this mani. One full wrap on both my ring fingers and one wrap cut in half on my middle finger. On all my nails I put on aEngland Holy Grail, which is a sparkly antique gold. I finished the design off with a row of round gold studs along the edge of the wrap and a black and gold stud on my other nails.
I really loved this mani, I actually wore it to work for two days in a row. People at work even wondered what was wrong because I don't changed my polish over night.
These are thicker than other nail wraps made of nail polish. I'm not sure what these are made of. They removed easily with acetone, but they don't dry out. Because they are a little thicker, you need to work the wrap around your nail gently so you don't get wrinkles. Mine worked out quite well. If you don't like the textured feel to them, you can add top coat to smooth them out. I had top coat on the nail with the stud down the middle and no top coat on the full wrap nail. They lasted the two days I wore them perfectly, and I could easily got another 2-3 days out of them
I actually hadn't even heard of these Revlon Marchesa nail wraps until I saw them, and now that I have googled all the design, I absolutely love and need to wear them all.
Thursday, January 16, 2014
Ms. Cat
Today I have another set of nail polish wraps to share with you, and they are simply the most adorable design ever! These are Melodi brand nail wraps from the Born Pretty Store and they feature a mix of different cat designs.
The pack features six different designs on 14 nail strips. Only the paw prints are repeated. One pair of strips has a black base and the words Ms. Cat and the remaining ones have a pale pink creme base with various cat images.
Application was just as good as any other brand I've tried and the wraps had a nice shiny finish without needing top coat.
I used the remaining strips in the pack to put together a pink and paw print mani for Miss 3. She told me she loved them, but it didn't stop her picking them off within 48 hours!
These next photos were taken in the sun at the end of day two, so they show some tip wear.
I've added these to my ongoing brand comparison wear test. These stood up surprisingly well, especially considering I was swimming everyday wearing these - and usually my nails chip off on the first swim in the pool.
Whilst I'm really happy with the wear and quality of these nail wraps, what I'm not so happy about is the time taken to ship my order. From the time I placed my order to when it was marked as shipped in my profile was four weeks! It then took another two weeks to arrive. I'm very happy with two weeks shipping, but having to wait a month for the order to be packed and shipped is far too slow in my opinion.
And it's not just this on occasion, I place another order on 28 December, and it was only marked as shipped today, so just under three weeks to have it shipped. I have emailed them about it, and they reply very politely with apologies about the delay. I really hope they fix their shipping process, because I really love products from the Born Pretty Store.
If your prepared to wait for the shipping, you can use my Born Pretty Store code of MNPG10 for 10% off..
About Me
- Kitties26
- I live in Canberra, Australia with my husband, Mr Ten and Miss Eight. My blog is all about nail polish, and a few other bits in between. You can contact me at morenailpolish@iinet.net.au