Showing posts sorted by relevance for query incoco. Sort by date Show all posts

Tuesday, November 19, 2013

on 36 comments

Incoco Nail Polish Applique review and wear test

I recently got the opportunity to try some Incoco Nail Polish Appliques. Incoco sent me three sets, but I've only worn one so far and I also did a wear test like I have previously with the Sally Hansen and OMG brand strips.

What impresses me so much with the Incoco strips is the massive range of designs they have. When looking at nail strips I always try to get something that I couldn't easily create using stamping, such as simple black designs on a solid base colour. With Incoco, I had so many choices. This design is called Tribal Dance and it has a silver foil base with black tribal printing and sections coloured in pink.

The strips are very easy to apply, although I am now starting to feel like a bit of a seasoned pro at applying them. They are strong enough to withstand one or two lift offs and repositions without tearing and they a soft and flexible so you can stretch and smooth them out over your nail. I like the fact that each applique is already cut out and loose (just like the Sally Hansen and OMG), rather than stuck to a full sheet (like the Ulta3 ones). This makes finding the right sized strip so easy, as you can just line it up and wrap it around your nail. The pack comes with 16 nail strips and I was able to find a size that fit every nail without having to cut any down.

The instructions say to peel the clear covering off the nail strip before peeling the paper backing off. I actually found it easier to leave the clear strip on the front until I have the nail strip positioned correctly on my nail. I then carefully peel the clear covering off and push the applique down firmly on my nail.

The instructions also say that Incoco nail polish appliques contain base coat, colour and top coat, so there is no need to apply top coat. With both the OMG and Sally Hansen brand strips, I felt I needed to apply top coat to seal it all in. This time around I followed the instructions and went top coat free.  Without top coat they were still smooth and glossy, so missing the top coat didn't seem too much of an issue. I was particularly interested to see how they would wear without additional top coat applied.


Now for the wear test. As a blogger who posts daily, I naturally change my nail polish daily. But I did leave one applique on my right hand for a full seven days to do a wear test. As you can see, the wear is outstanding. By day 7 there was no chipping and about half a millimeter of tip wear.  They say can can wear these up to 14 days, and I imagine they would still be ok, except for the regrowth at the cuticle edge. 


I would have difficulty in saying which of these brands wears the best over a week. I'd certainly be happy to recommend any of these three brands to anyone as they all performed really well.

The only down side for me is that because they real nail polish, unused appliques will apparently dry out over time. I did seal my unused strips back up in their sleeve with sticky tape, so I'm hoping to still be able to use some in future skittlette manis. 

Incoco nail strips are available for purchase through their website and cost $8.99 per pack. They also carry a large range of french tip designs and pedicure designs. 

If you made it all the way through this post, thank you, and I have a special gift for you.  Incoco have kindly offered to giveaway a set of nail polish appliques to one of my readers. The winner will get to choose their favourite design and the appliques will be sent directly from Incoco.

To enter, all you need to do is:
  • visit the Incoco website
  • find your favourite shade
  • write the name of that shade in the comments section of this blog post.
I will randomly select a winner from all the entries and post the winner here on my blog.  The winner will have three days to email me. Failure to email me will result in a redraw.  The winner will receive the shade they commented.  Giveaway is open for one week and closes at 12.00 midnight Australian Eastern Daylight Savings time on Tuesday 26 November 2013.  Giveaway is open internationally.

Thursday, March 20, 2014

on 3 comments

Incoco Nail Polish Strips - Garden Daydream selection

I have three recent manis I wore featuring some of the new Garden Daydream Incoco nail polish strips. You can read about my previous review and wear test on Incoco nail strips here.

Garden Path and Down to Earth - For this mani I tried something I've not done before, I created a ruffian design by stacking two nail polish strips on top of each other.  I saw this done on some other Incoco manis and thought it looked excellent.  The strips create such a perfect ruffian because of the pre-cut curved cuticle edge.  

I started with a full base of Down to Earth, which is a pastel light green creme shade.  On top of that I applied Garden Path leaving a few millimeters of Down to Earth showing at the top.  I kept my index finger plain as an accent.  The white base colour on Garden Path is a little sheer, so the green shade beneath shows though making it blend even more.


Apple Blossom - For this mani I did a bit of mix and match.  I wore Apple Blossom nail polish strips on my thumb, middle and ring fingers.  On my index and pinky I did a pale pink to white gradient and then sponged on a single layer of Ulta3 Marshmallow, which is a frosty white.  The sponged frosty polish on top of the gradient created a smooth shimmery sheen similar to that of the nail polish strips.


Tea Party - The nail polish strips in this set contain a mix of spring roses over pale pink polka dots, as well as some that are just the pale pink polka dots with no roses. I really loved how that strips I selected as the right size for my nails created a flowing bramble of roses across my nails.  I actually only noticed it when I was taking these photos.  I really loved this design as it has those little roses that many clever free hand nail artists can paint, but this is the super easy way to get the same look.


All these designs are just so soft, feminine and spring like, I really liked the appearance of all of them.  These are only a few of the eight nail art designs and four creme shades available in the Incoco Garden Daydream collection.

Thanks for looking. Which design is your favourite?

Products provided for consideration.

Saturday, November 30, 2013

on 8 comments

Incoco Crown Jewels and giveaway winner

I have another design of Incoco nail appliques to show you tonight, and I think these are definite my favourite. These were my first choice from the huge Incoco range.  This design is called Crown Jewels and the base is a silver foil, then it has lines in purple, pink green and orange, as well as dotted purple bands going the other direction.

What I really love about this design is that it is not something I can create freehand or with stamping.  It is so intricate and so absolutely perfectly printed that it just looks stunning.  

Application was easy, just like the last time I applied an Incoco applique, and also like last time, the wear was really excellent. 

Most of these photos are shown in the shade or partial sun.


As I was stickng my nails on, Miss nearly three came and asked me to do her nails.  So far I've not managed to find anything that will stay on Miss twos nails for more that two days.  I don't know if it's the oils in her nails or what, but every brand of polish just flakes and chips off.

I had the brilliant idea of using the back half of the design from my nails on her nails.  There was plenty of excess that I would have just thrown away otherwise.  I have to say that nail stickers/appliques are just perfect for childrens nails because there is no drying time. Once they are on, they are perfect.

Our nails were such a cute match and she was very proud of her sparkly and patterned nails.  I had very high hopes that these nails would last a lot longer on her than regular nail polish.  On day two they still looked as perfect as they were when I applied them.  Sadly, whilst I was at work on day three, I returned home to discover that she had picked at her nails and removed all but one nail!!  Doh!  I will definitely buy some more appliques to suit her, but I'm going to wait until she is a bit older so she wont pick them off.


Finally, I'm excited to announce the winner of a set of Incoco Nail Appliques of their choice.  I printed out each entrants name on a piece of paper, folded them up, and did a lucky draw for the winner.


I'm so excited for my winner "Rainbowify Me".  I have no doubt that she will see this post and know she is the winner, because she is absolutely be my #1 blog commenter of all time.  I'm really excited that she won!  Please send me an email and I'll give you the details of how to claim your prize.

Also, a big reminder that my Guess that Gold 1000th post giveaway closes at midnight tomorrow.  

Thursday, December 12, 2013

on 5 comments

OPI Pure Lacquer Nail Apps - review and wear test

In my continuing quest to try out as many different brands of nail wraps, I recently purchased some OPI Pure Lacquer Nail Apps.  These were released around the middle of last year. 

The first thing I found was that I didn't have much choice in the designs I could find.  Especially compared to the huge array of designs you can get from the Incoco brand.  I found my cheapest option to try these out was to get a set off ebay.  The Recommended Retail Price for these here in Australia is $19.95, but I got mine for $7.95.

Application was ok.  They feel a little thicker than the Incoco, Sally Hansen and OMG strips, but they still were easy enough to stretch out and smooth down onto the nail.

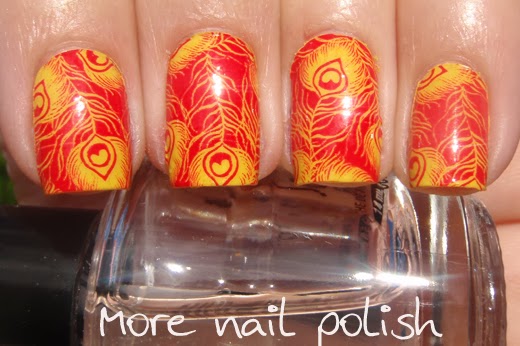
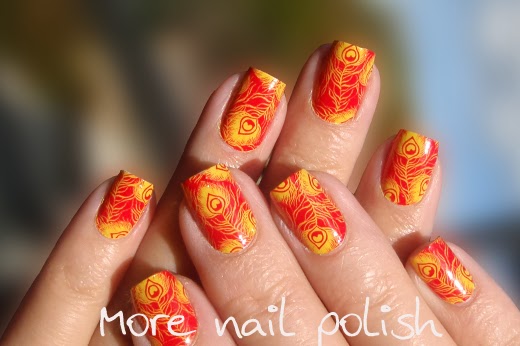
This design is called Peacock and I can't tell if it's a yellow base with red on top or vice versa. I normally wouldn't purchase a nail wrap that I can recreate with stamping, but I didn't have many choices unless I wanted to drop the full $20 in store on them, and I wasn't doing that.  I think this design is definitely something that could be recreated via stamping, especially with all the stamping plates that have peacock feathers on them these days.

Most of the online images of this design show it to be a pink and yellow design, not red and yellow, so I was a little shocked when I opened the package and spotted such a bright look.


As I did with my previous nail wraps, I gave this OPI nail app and good test out on my right middle finger for  a full week.  Here is an updated wear test diagram.


I was really happy with the wear test on the OPI nail app.  In fact so far I've been really impressed with all these strips that I've worn for the wear test.  They all hold up really well and only show slight tip wear at the end of the week.  

The OPI wraps are good quality and wear well, so if you can find a design that appeals to you at a price point that is ok, then they are a good option. Here is an updated price comparison of the various nails wraps that I have tried.
  • Sally Hansen $14.95 for 16 strips (Australian price at Target), can be found cheaper online - $1.07 per strip.
  • Incoco $9.00 for 16 strips (online price) 56c per strip.
  • OPI $19.95 Australian RRP for 16 strips - $1.24 per strip. Can be found much cheaper online - I paid $7.95 - 49c per strip.
  • OMG Nail Strips $6.89 for 14 strips (online price & cheaper if bundled) 49c per strip.
  • Perl $9.00 for 20 strips (online price) 45c per strip.
  • Ulta3 $5.00 for 16 strips (in store price) limited availability 31c per strip.
  • ALDI $6.00 for 20 strips (in store price) limited availability 30c per strip.

Wednesday, January 8, 2014

on 5 comments

Incoco Nail Appliques skittlette

I loved the 'Crown Jewels' design of nail appliques from Incoco that I wore late last year so much, that I didn't want to take them off too quickly.  But I also like to have a fresh look on my nails quite often, at least every 2-3 days. It was on day three when  I decided to freshen up this look by creating a skittlette mani.  

I kept the Incoco nail appliques on my middle finger and thumb, and at the end of day three you can see the slight tip wear.  I painted my ring finger silver using Starflower from Kester Black.  I then placed some square rhinestones down the middle of the nail in matching colours.  

On my index and pinky fingers I created a four colour gradient in the same colours as the nail applique. I'm really struggling to remember each of the colours, but they were all Zoyas. I think they were Mimi, Gilda and Ivanka, together with Kester Black Starflower..  I have to say that sponging with those glass fleck Zoya polishes really makes a mess and it takes ages to clean up!


Monday, October 5, 2015

on 10 comments

Jamberry nail wraps - review, swatches and wear test

Alrighty, I have a lot in today's post, so apologies that its a long one.

Today I have some swatches, a wear test and my review of Jamberry nail wraps.  First I'm going to talk about the product themselves, how they applied and wore, then I'll get into some of the other Jamberry business!

Jamberry just launched here in Australia on 1 October, and as such, I have been inundated by emails from consultants offering to send me some samples to review, and seeing if I was interested in becoming a Jamberry consultant.  The simple fact is that no, I'm not interested in becoming a consultant and never will be. I have an excellent, high paying, secure job that I really love so I have no need to earn a little extra on the side, nor do I need to rely on nail wraps to have pretty awesome nails every day.  But that doesn't mean I don't see the market for nail wraps.  There absolutely is, and I can see why it would work really well as a party plan product.

Anyway, I replied to one of the consultants who emailed me, and she really was lovely. She sent me a small pack to try out.  There were 12 different sample wraps, a full pedicure set (not shown in photo below), an alcohol prep pad and instructions.


The first wrap I applied was the Burberry pattern (shown during the 31 Day Challenge), which I was able to cut in half and apply one half to each nail.  My nails are at the longest I like to wear them, and there was plenty of wrap left at the tip of each finger, so unless you have really, really long nails, then you would easily get two nails out of each wrap. 

The problem I had was that the sample wraps area really narrow, like REALLY narrow.  The first few designs (eg pink quatrefoil, black and white flowers, blue snake skin and beige gradient) were even too narrow for my pinky finger.  The floral design is very narrow, but I tried it below on my ring finger.  The burberry design and the two bottom designs were the only ones that would fit a middle finger, and as you can see below, they left a massive gap on each side of my nail.


Argh - look at that massive gap on the sides of my nails.


I emailed the consultant who sent me these and she said that these are just samples, and the full manicure sets do come with a much larger range of sizes.  But you'll just have to take her word for it, as I haven't tried a full set.

Now for application.  Jamberry wraps require heat to activate the glue that adheres them to your nail, very much like the minx nails I tried during the 31 day challenge.  Consultants have little heater fans that they use and sell for applying Jamberry wraps, but I didn't have one of those, so I made do with something every house has, a toaster!  I held my wrap with tweezers about 10 cm above the top of the toaster whilst it was pushed down.  The wrap was quite stiff to start with, but then I could see it wilt before my eyes and I could tell it was softened and ready to apply.

Once it was soft and pliable, I applied it to my nail.  They are nice and strong so you can re-position it if you put it in the wrong place, but if you take too long the wrap will start to harden again.  If that happens just hold your fingers over the toaster to warm them up again.  If your wrap is nice an warm then application is a breeze.  You can pull them smooth and easily get them on without any wrinkles.  I have a very strong 'c' curve to my nails, so I was glad to see them applied so smoothly.  If you're not able to apply the wraps smoothly, then it's highly likely they didn't warm up enough to soften and stretch, or they cooled and hardened as you applied them, at least that was my experience.

Here is the second mani I created using the flower design.  Again, this wrap was way too narrow for my nails, and I don't consider myself to have wide nails at all.


I kept the Burberry design on my right hand for a whole week to fully test out the wear.  I was very happy with the wear.  I'm a full time working, busy mum of two children, so my hands get a good workout. I even did gardening the week I wore these (with gloves on of course!).  Below is my running comparison of how the Jamberry nail wraps compared to other nail wraps that I have tried.

As you can see, wear was good, but by day 7, they were just starting to lift at the corners on the tip.  They are certainly comparable to other well known brands like Sally Hansen, Incoco and OPI.


Removal was very easy too.  I just held my nails over the toaster again until my fingers felt warm, and then I used tweezers to grab the edge of the wrap and easily peel it off. No residue was left of my nail, but just I gave it a clean with polish remover anyway.

Now for my price comparison. Rather than price per wrap, I'm comparing them on price per full 10 finger manicure.
  • Jamberry AUD$22 for 18 strips $1.22 per strip, but you get two full manis per box (+two full pedicures), so $11 per mani and less if you consider the pedi's.
  • Sally Hansen AUD $14.95 for 16 strips (Australian price at Target), can be found cheaper online - $1.07 per strip but only one full mani per box, so $14.95 per mani.
  • OMG Nail Strips USD$7.99 for 14 strips (online price & cheaper if bundled) 57c per strip, but only one full mani per box, so $7.99 per mani.
  • Incoco USD$8.99 for 16 strips (online price) 56c per strip, but only one full mani per box, so $8.99 per mani.
Pls note: the inconsistency in currencies.  You should take into account your exchange rate to determine the best value.

Another plus for me is that these don't dry out once they are open, unlike Sally Hansen, Incoco and OPI. The OMG strips and ones from the Born Pretty store didn't dry out either, and to me this is so important if you want to be able to wear them lots of times as feature nails etc.

I also really like the range of Jamberry nail wraps, there are some gorgeous designs I'd love to wear, but instead I'll just drawn inspiration from them and create them with polish, stamping, vinyls or free hand.

Ok, so now that I've talked about the product, let's talk about the business.

From what I understand, a Jamberry consultant is similar to being a consultant for any other multi level marketing (MLM) business. Consultants are signed up 'under' other consultants.  Some MLM companies work really well and have built really good names for themselves, like Avon and Tupperware.  But sadly, I came to know of Jamberry because of numerous negative reports through the nail world.  Let me tell you about the ones I know of.

The most recent has been the reproduction of PiggieLuv's autumn leaves design by a Jamberry consultant who said they came up with the design herself. Here is the Jamberry version. It's not so much that the design was copied without credit (although it is credited now), but the fact that Narami's copyrighted photographs of her manicure were used to advertise the Jamberry wrap.

That was the the most recent issue, previous to this I have seen Jamberry consultants running online competitions inviting participants to upload the worst nail art they can find on the internet and the person who finds the worst picture wins.

I've also seen comments from Jamberry consultants against Instagram photos suggesting that the nail artist try Jamberry wraps instead. Oh sure, they don't actually say that the nail art is no good in the comment, but they may as well have said, your nail art is shit, you should try these cause they'll be so much better.

The common thing I've noticed here is that it's all the consultants doing this.  What this tells me is that Jamberry mustn't be training their consultants in general online etiquette, and if they do, then they are teaching them some very odd practices!

So with Jamberry launching here in Australia this week, I can guarantee that there will be lots of new online party requests and comments about Jamberry in various Facebook groups, I've already seen about 5 this week.  You just need to check out the Jamberry Australia Facebook page to see the number of consultants already signed up that have received their starter package.

I'm now talking to all those new Australian consultants, please don't be dicks!  Don't insult people. Be personally creative when designing nail wraps. Don't push your product so hard that you piss off all your friends and family.  From what I've sampled, the product is good and there are lots of designs available.  Let the product sell itself.

But, if anyone is interested, you can contact the lady who sent me these wraps (I get no kick back here other than the samples seen above) who can help you with wraps or becoming a consultant if you so wish.

Wow, that was a long one!

Friday, November 9, 2012

on 5 comments

Review: Perl Nail Polish Strips in Cheetah Girl

I was recently sent a sample of PERL Nail Polish Strips in the "Cheetah Girl" design to review.

PERL is a Canadian brand and they specialise in these nail fashion strips.

I don't have a very much experience in applying nail polish strips, so I'm actually a really good test subject to try these out.  I wondered if they really would be effortless, surprisingly quick to apply like they claimed.  The only other similar product I have tried are the Ulta3 nail stickers.

First of all, here is my finished mani.  The Cheetah Girl design has a pink base with darker pink and black cheetah spots in a smooth creme finish.  This is not a design I would have chosen for myself because  it's a relatively easy design to create using freehand nail art techniques. But anyone that doesn't like freehand nail art (or stamping) would certainly find this design appealing

The little box comes with two sealed sets of 10 nail polish strips, an instruction booklet, a file and cuticle stick (both which I forgot to photograph).  Each of the 10 strips is a slightly different size.  I lined them all on from smallest to largest, and found that the smallest strip was a perfect fit for my pinky, then I skipped the next strip and the third strip was perfect for my ring finger, and so on.  I ended up finding an exact fit for each nail on my left hand.  For my right hand I had to trim a little excess off each of them. The easiest way I found to do that was to trace around the correctly sized strip on the larger strip and then cut along the line

Cost

The strips cost $9 dollars for the packet and you will get two full manicures out of the box. Unlike the Ulta3 stickers, or the Sally Hansen or Incoco Strips where you get a choice of 16 strips, I love that you get 20 strips.  This is a huge point for me, because it effectively halves the price of them.  So with a quick cost comparison based cost per manicure:
  • Sally Hansen $18 (Australian price at Target)
  • Incoco $10 (online price)
  • Ulta3 $5 (In store price)
  • Perl $4.50 (online price)
So, I've established that these are a very cost effective option, but the question is, are they any good?

Ease of application

I found these very, very simple to apply.  Firstly, it is really easy to select a design that fits each nail because you can just pick them up and line it up on your nail to see if it fits.  Each strip has a plastic backing and um fronting...  Basically the polish is layered between two pieces of plastic that easily peel off.  I pulled of the backing piece with revealed the sticky side and just stuck it to my nail.  I then lifted off the 'fronting' and smoothed the strip down onto my nail.  

Like all nail strips, you have to file off the excess at the free edge.  These strips are thin, so this process was very simple.  I applied a single layer of top coat and wrapped my tips for extra protection.

I completed my full manicure, both hands, in under 20 minutes and it was only the second time I've ever applied something like these.

Quality

I love how thin and flexible these strips are, they are almost rubbery.  Because of the flexibility, I found they were really easy to smooth down around my curved nails and not get any wrinkles.  They are also made from real nail polish - I even checked with the PR company because I was so impressed with the finish I figured they must be something else.  They also confirmed for me, that while they are made with real polish, they wont dry out.

The free edge of my nail was not rough or scratchy and these seemed to wear more like nail polish, in that I got some tip wear rather than peeling.

Removal

Because they are made with real nail polish, they just remove like real nail polish.  A quick wipe with remover or acetone and they are gone.

Verdict

I guess with any product received for review, the big question is: would I actually spend my money and buy these?  The answer is yes and in fact I already have.  I have placed an order for some of the designs that are more suited to my tastes and ordered some for my mum too.  Orders over $35 get free shipping, so that what I'm doing.


Product provided for review

About Me

My photo
I live in Canberra, Australia with my husband, Mr Ten and Miss Eight. My blog is all about nail polish, and a few other bits in between. You can contact me at morenailpolish@iinet.net.au