Thursday, May 12, 2016

on 7 comments

The Digital Dozen does Whimsy - Neon bubbles

It's day four of the Digital Dozen Whimsy week already and today I've gone with a much more abstract approach to the theme.  The definition that google gives us for Whimsy is "playfully quaint or fanciful behaviour or humour".  So while I couldn't show a behaviour on my nails, I could sure show a playful and imaginative design, which would surely fit the theme as well.  

This nail art was so fun to create, especially the part when you use nail polish remover on your nails to make the design magically appear.  To create this look you need gel polish.  I used a white gel polish base by Australian brand Gelicious.  You will also need a gel top coat, again I used the Gelicious Ulta Glaze top coat.

The idea is that you paint a design on your white gel base (I did a bit of neon sponging) and then you apply dots of clear gel polish.  After curing it, you use polish remove to remove the polish that isn't protected by the top coat, thus making it white again between all the bubbles.  I really want to do this again with smaller dots and maybe some stamping as well as a gradient beneath the bubbles.  I also want to try it with darker shades like a black base and then multichrome bubbles.  Oooohhh so many designs to try and only ten little finger!


I'm just off to finish editing my video for this, so make sure you jump over to instagram and check it out.

Wednesday, May 11, 2016

on 6 comments

The Digital Dozen does Whimsy - Seasons tree art

Day 3 of Whimsy and the idea for this nail art has been in the back of my mind for quite a while.  It's funny, cause a few of the other DD ladies have also done whimsical trees for this weeks prompt too. 

This nail art is inspired by those four panel seasons paintings.  I'm somewhat happy with the final look, but it took quite a while to achieve on all ten nails. Doing the gradients in different colours was slow to start with. Then I painted the tree branches using a few shades of brown polish.  Then I went crazy with a dotting tool.  

I was actually happier with how I painted my right hand! Isn't that ridiculous. I used a smaller dotting tool on my right hand and did less dots and it looked better because you could see the tree branches clearer. I have included a photo of my rarely seen Cinderella hand down the bottom.  Sadly the photography is not great because for the life of me I can't work out how to hold a bottle for a nail shot with my right hand. Is anyone else like that or just me.  I'm completely awkward when trying to photograph my right hand, and am what my mum would call 'cacky handed' I believe that one is an Australia colloquial term.


Tuesday, May 10, 2016

on 2 comments

The Digital Dozen does Whimsy - Fairy at night

One thing I certainly found when googling for whimsical pictures was that fairy's are definitely whimsical. I searched though all my nail plates to find a fairy image, but would you believe that I found the perfect image on a new plate that I just got in the mail the day I painted these nails.

The plate was DRK XL Magic Garden. I haven't even had a chance to really look at the plate properly yet, that that fairy was perfect.

The mushrooms and grass were stamped from EDM07 plate.  The moon was painted free hand.  Now would you believe that the base polish I actually started with as Picture Polish Whimsy?  I just had to use a polish called Whimsy for the whimsy theme.  But after I sponged on the darker jelly colours in blues and purples from the Dance Legend Enamel Glass collection, there was pretty much no trace of whimsy left.  Oh well, at least I knew it was at the heart of this mani.  

As a last final touch I added some iridescent flakes to the fairy's wings and added some holo glitter as sparkly stars in the sky.


Monday, May 9, 2016

on 2 comments

The Digital Dozen does Whimsy - Whimsy cats

The theme for this month's Digital Dozen is Whimsy.  Arrgh, I curse whoever came up with the Whimsy theme, it is impossible!  

I've done lots of things to get some inspiration for this week's manis. First I googled the actual definition of Whimsy - 'playfully quaint or fanciful behaviour or humour'.  What! How do I translate that to my nails.

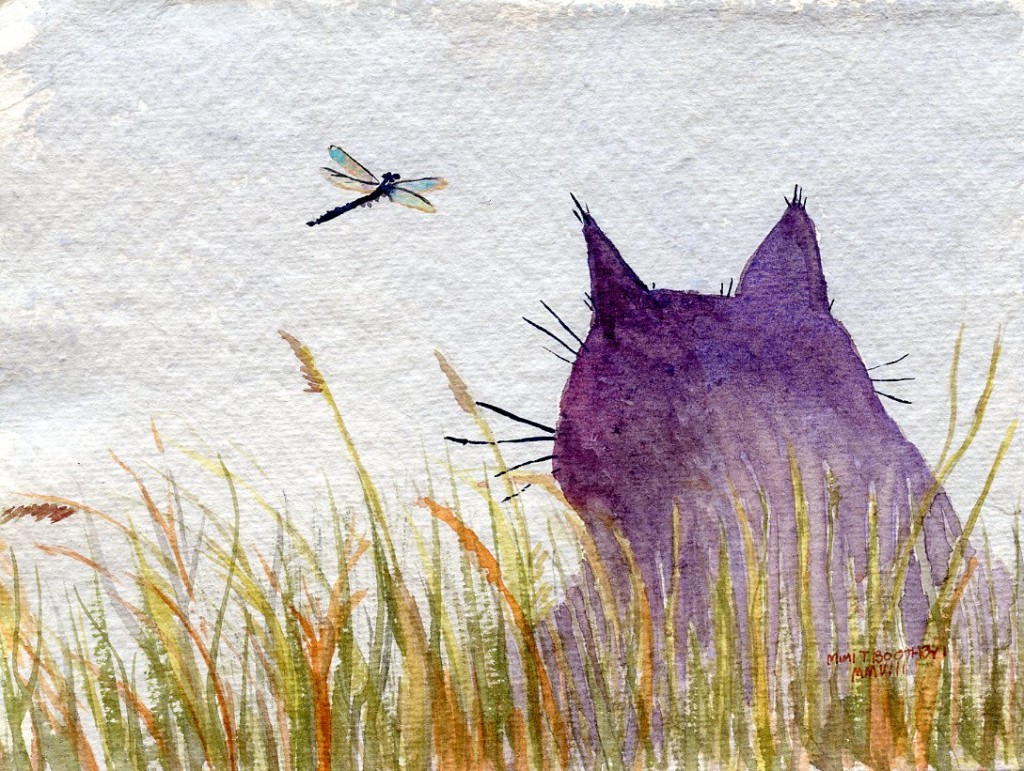
Next up I did a google image search on the word Whimsy.  And there, as the second image on the google image result was this adorable watercolour picture, painted by Mimi Torchia. I was captivated by it and instantly knew what my first 'Whimsy' nail art design would be.  

This is free hand painted using polish, except for the dragonfly, which is stamped from a Messy Mansion plate.

This is going to be a tricky week!


Saturday, May 7, 2016

on 4 comments

Lots of Great Floral Nail Art Ideas

So after so many people have dropped out from this year long challenge, I've decided to follow suit of a few other ladies, and drop the '40' from the blog title.  There hasn't been 40 manis for many weeks, so instead I'll just go with 'lots'.

This week's theme is Floral, and I've recreated a similar design that Sarah from Chalkboard nails created a few years back with Black-eyed Susan with fully centres.  Here in Australia we don't have Black-eyed Susans, as they are native to North America, but we do have lots of other varieties of daisy's and they all pretty much look the same right.

These were all painted freehand, which is probably quite evident.  But it is the sort of design that is achievable on both hands without having to resort to creating nail decals for you other hand.  My favourite part of these is most definitely the flocking powder 3D centres to these.


Thursday, May 5, 2016

on 2 comments

Holo droplets feat. stencils from What's Up nails

Argh, what is this with the 11.30pm quick blog post before bed.  Usually I do a blog post before I go paint my nails, but tonight I painted them first (and they took ages (and I don't like them very much)). I have a few edited photos of different manis to share, but they are needed me to do something extra, such as edit a video.

I just edited my video for these, and all up it took me 25 minutes to do all the trimming, editing, adjusting speed, adding watermarks etc to the video.  Who has time to do this!  I don't know how those girls with millions of follows manage to post nail art with tutorials every day!  They mustn't have demanding jobs or children!!

As the title suggests for this mani, I used some nail vinyls from What's Up nails for this look.  I started with a solid blue creme base, I used Pretty Serious Type 40.  I then applied the nail vinyls and used three of the blue holos from the China Glaze Hologlam collection to create a soft holo gradient.

I've used the What's up nai vinyls before and they are good quality.  They are easy to peel away from the backing paper without having to push out every hole cause the cuts are precise. They also last well when you have thin sections of vinyl (like between these drops) and then apply lots of polish on top. They don't melt and stay strong for a good peel off.


Don't forget to jump over to Instagram to see the video for these.  I can't wait until Instagram rolls out the 1 minutes videos to everyone.  Then I wont have to do these lightening fast tutorials that are done in 15 seconds.  It's not fair that they have rolled it out to some special users and not everyone!

Nail vinyls provided for consideration.

Tuesday, May 3, 2016

on 4 comments

Shimmery gradient with 3D gel polish shell

It's been ages since I played with some of my gel polishes to create something a little 3D.  I think the last thing I did was the white gel design of the face and hands for the Supernatural prompt of the 31 Day Challenge last yet.

Anywho, I spotted a shell design using gel polish somewhere, and I thought I would try my hand at that.  To give it a mermaid-ish feeling, I didn't a simple blue and pink gradient using Face of Australia Calypso Bay frosted polishes.  I then applied top coat and dipped each nail into some pink iridescent glitter.  Even with top coat applied, it was a very textured finish and super sparkly, but holy sh1t did I get glitter everywhere!

For the shell nail, I just just white gel polish to build up some ridges. I added a gold star fish charm from the Born Pretty store at the top of the nail.


Monday, May 2, 2016

on 1 comment

Peacock nail foils

In my last set of products from the Born Pretty Store, I chose some Peacock design nail foils.  The package comes with a really long roll of the foil, so there is no worries about ensure you have enough for all your nails.  There were some beautiful pictures on the Born Pretty site that showed this foil over pastel shades and natural nails, so I thought I would try it over two darker shades.

What I didn't realise was that these foils have a full holographic sheen over the entire foil.  This reflects light beautifully, but when worn over darker polish it looks rather grey and dull in lower light situations.

I painted two nails with Picture Polish Midnite Meteor and two with Hercynia and the design looked pretty over both, although I think my preference was over Midnite Meteor. 

I also stepped away from my usual go to top coat for nail foils (Picture Polish Revolution) because I was feeling lazy and there was something else in front of me that I thought I would try. Born Pretty store Mirror polish top coat.  The one and same that I used as a base coat for the mirror polish here.  It worked great, although dry time is an eternity! It doesn't wrinkle up the foil and then you can apply a regular top coat over it.


Took a quick photo of Midnite Meteor and Hercynia before applying the foils.  Geez, I can't believe how long my nails are here.  I cut them all down cause they were starting to irritate me, so I must get all these long nail photos out before I show some shorter nail ones.


About Me

My photo
I live in Canberra, Australia with my husband, Mr Ten and Miss Eight. My blog is all about nail polish, and a few other bits in between. You can contact me at morenailpolish@iinet.net.au