Saturday, March 9, 2013

on 22 comments

Hot air balloon nails for an adventure

I did some quick nail art on Thursday night, because there was no way I was staying up late to do my nails last night.  We had to be up bright at early is morning to leave the house by 5.15am, as we were going on a balloon ride - Yippeee, it was fantastic, but first the nails.

I used Picture Polish sky as my base colour.  I printed out some water decals, cut them out individually and placed them on my nails. Every nail on both hands was different.


Now to the balloon ride.  We have a public holiday this weekend in Canberra, for Canberra day. However this year is special as it's the centenary of the city.  Every year during the 9 day long  Canberra festival they have a balloon festival, with balloons taking off from the lawns of old parliament house.  Today was the first day of the festival. Every year they bring in some 'special' balloons, this year there was a lions head, a turtle, a peacock and Darth Vader!  All the special balloons are privately owned, so you don't get to ride in those, but our regular balloon was just perfect.


Here are a couple of photos of balloons in the sky, it was around 7.45am and shows less than half the half the balloons.


A little earlier, and a lot higher, here is the view of Lake Burley Griffin, the National Museum and Commonwealth Avenue Bridge. We were able to get about 25 balloons in this shot.

A nail shot (of course), looking down over some of the embassies in Yarralumla.


And did I feel like a complete doofus taking this nail shot at 3500 feet in the air, with balloons in the background? YES, but what an awesome shot!


Lastly, here is the PRIME balloon that were were in - can you see me?


My Mum and Dad were so awesome, they came out with us at 5.15 in the morning and looked after Mr 4 and Miss 2, who both thought the experience was amazing.  The kids got to watch and help with inflating and packing away the balloon, and naturally Mr 4 wants to go on a balloon ride himself now, even though he can't see over the edge of the basket.  They all drove along behind the crew 4WD, following the balloon, waving up at us from the ground and taking lots of photos for us. Thank you M&D!
Friday, March 8, 2013

on 3 comments

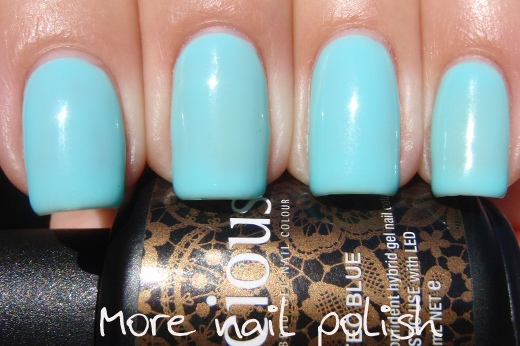
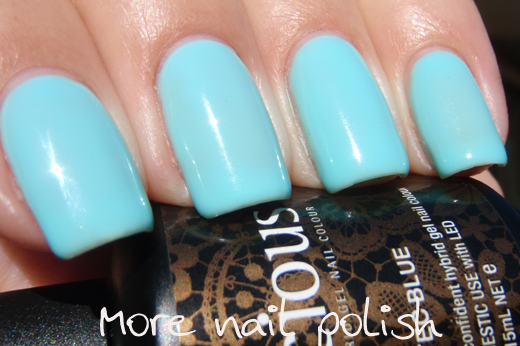
Gelicious - Aztec Blue, Beachy Peachy Coral & remover wraps

I have some swatches of two Gelicious hybrid gel polishes from the "You like it, we make it" range.  These two polishes were the first two shades that where 'liked' by Gelicious Facebook fans the most, and subsequently created a polishes.

The thing with gel polishes is that you can't just swatch them like you would with regular polishes, because of the curing and soak off process.  I'm slowing working through the entire Gelicious range to create swatches and a colour guide. I've been really enjoying wearing each of these shades for a while - often applying different glitters and toppers to change the look. 

Aztec Blue - a creamy pastel duck egg blue.  I used three thin coats of Aztec Blue and then the Ultra Glaze top coat to get a smooth and super dooper shiny finish.All photos are taken in the sun, which brightens up the colour. You can see what it looks like in the shade in the image with my hand on the wood.


Beachy Peachy Coral - a gorgeous peachy coral tone as the name suggests, in a smooth creme finish.  Again I used three very thin coats of Beachy Peachy Coral, topped with Ultra Glaze Top Coat.  This was a very flattering pink tone on my nails.  Again, all photos are in the sun, except the one with my hand on the wood.


When I received these polishes I also received the Pro-to-Home LED nail lamp - no more having to steal the lamp I bought for my mum!  New new lamp is fantastic. It's the top of the line lamp from Gelicious and I just love how you can preset the timer on the lamp from 30, 60 or 120 seconds and it comes on automatically when you place your hand under it. I previously used a stop watch app on my ipad while I was timing my curing - so this just makes the process so easy. It's also plenty big enough to fit your toes into with bumping them. The wattage is also higher and there are more LED lights in it, which makes me feel like it does a much better job,

The other thing I received to try were the new Gelicious remover wraps.  I thought these were going to just be a bit of foil with a bit of cotton stuck on them, which they are - but they are so much more than that too.  There are a bunch of photos below to show what these look like.  


They are a rectangle of foil, with one of the longer edges folded upward - this is the edge that you put at the open part around your nail (not the bit you twist up).  By having the fold of foil it creates a leak barrier to stop acetone escaping.  


The piece of foil has a large rectangle of very dense, white cotton - it's almost felt like.  You put the acetone on the pad, then wrap you fingers like you would normally do with bits of regular aluminium foil 


See, gorgeous wrapped fingers.


The big difference with these remover wraps compared to regular cotton and foil is that the wraps are very sturdy.  The foil has some sort of plastic backing which means it doesn't rip not matter how tight you twist the top around your nails.You can easily use them several times.  After removing them, I just unravel them and put them into a zip lock bag.


Finally, here is a sneak peek of the gorgeous Gelicious polishes I have in store for you. And just quietly, how freaking amazing is this soft bubble plastic bottle holder thingo!


Info about pricing for the lamps, hybrid gel polishes and remover wraps are all on the Gelicious website.

Products provided for swatching and review.

Thursday, March 7, 2013

on 20 comments

Unzipping my denim

Here is some nail art I created this week using zipper water decals I purchased online. I'm so happy with how this came out.

I used two coats of Picture Polish Beige as the base polish then applied Pitcure Polish Denim freehand to where I thought each decal would line up on the nail.  I can't believe how accurately I was was able to get the colours to line up with the decals.

I must need to thin my Seche Vite, cause it was a little shrinky on me for this mani and I usually don't have that problem.  I had to touch up the tips in the morning where the colour shrunk back over night.


Wednesday, March 6, 2013

on 7 comments

Ulta3 Dark Romance collection

I spotted the new Ulta3 Dark Romance collection at my local chemist on the weekend, and I couldn't help myself in picking up all six colours.  At $2 each you can't afford not to get these polishes.  As well as being uber cheap, they are also one the best Aussie brands for following our seasonal trends.

As a general rule, my photos are showing these polishes a little brighter than they are in real life, that is because I've taken all my photos in the full sun today and that makes them look more saturated.

Also a general rule about the formula, so I don't repeat myself.  All of these were well pigmented and provided full coverage with two coats.  I also think that the formula on these 'made in PRC' versions has certainly improved since they first changed the production of the polishes to China.  The brushes aren't as stiff and application is much smoother without the brush dragging marks into the polish..

Cherrylicious - a richly pigmented red red creme.Two coats with seche vite.


Chinchilly -a soft milk chocolate brown creme. It's a pretty brown, if you like browns, but it seems a bit out of place to me in this collection, I feel like it needs to be darker and richer, like dark chocolate not milk chocolate. Two coats with seche vite.


Get teal - one of my favourites from the collection and I've already wore it under a glitter earlier this week.  Leans a little more green than my photos show, but it's a gorgeous colour.Two coats with seche vite.


Lotsa fun - Another favourite, a gorgeous darkened regal purple creme. Two coats with seche vite.


Lucky Bamboo - a dark, nearly black looking forest green. Two coats with seche vite.


Rustic Red - this was a little sheerer than the others, and in these full sun photos you can see some transparency.  This one is also the only one to have a subtle shimmer. Two coats with seche vite.


Overall I like this collection very much, particular the Lucky Bamboo, Get Teal and Lotsa Fun.  I love how those these colours really feel like they belong together.

If you are looking to find some Ulta3 polishes near you, the Ulta3 facebook site has a stockist finder.  Of course this is purely for my Aussie readers tonight, cause Ulta3 is a cheap drugstore brand that doesn't ship internationally.  Sorry.

Tuesday, March 5, 2013

on 24 comments

Gradient halfmoon skittles

Today is another installment of nails inspired by instagram.  This time from @slacquerr who created a fantastic gradient half moon skittles mani.  I've chosen different colours and combinations, but the concept is still the same.

I received heaps of compliments on this mani, it was very eye catching and quite the talking piece.

To create this look you will need to find 10 polishes, with two in each shade. 
  1. Paint your base colour in the lighter shade and wait for that to dry
  2. Tape off your half moons, use hole reinforcement stickers or round dot stickers if you have them, otherwise just cut up sticky tape in circles like I did.
  3. Paint both the darker colour and lighter colour onto a makeup sponge and dab the gradient over the tape.
  4. Peel off the tape/stickers to show your creation.
This mani took just over an hour to do. The two most time consuming tasks for me were:
  • waiting for the base colour to dry enough so the tape wouldn't pull it up the polish.
  • cutting out 10 small half moons with sticky tape after tracing around a bottle cap to get a round shape DOH! - if you use round stickers this will save heaps of time!
The polishes I used were:

Index - Ulta3 Exotic Canary sponged with Ulta3 Tangerine Tango
Middle - Ulta3 Kiwi Kaos sponged with a franken made with TKB Chromium green pigment
Ring - OPI No room for the blues sponged with Cult Nails Time Traveler
Pinky - Picture Polish Wisteria sponged with Picture Polish Violet Femme
Thumb - Picture Polish Candy sponged with Ulta3 Pink Colada


About Me

My photo
I live in Canberra, Australia with my husband, Mr Ten and Miss Eight. My blog is all about nail polish, and a few other bits in between. You can contact me at morenailpolish@iinet.net.au