Saturday, January 25, 2014

on 5 comments

Aussie Nails - Kangaroo road signs #2

I did kangaroo road sign nail art last year, but with the arrival of my Moyou tourist plate 09, I had to attempt another version.

As you can see I did a road going off over horizon.  I used the kangaroo road sign from Moyou tourist plate 09 on my index finger in the hope that it looked like the sign was right next to you as you drove down the freeway.  To create the yellow background to the stamp, I used the decal technique where you colour in the stamp whist it's still on the stamper.  Then I applied a layer of top coat, counted to 20 for it to partly dry, then pressed the stamp down.

I feel these nails are a little lazy and I should have done some more details with the scenery.  I also think it's pretty hilarious that I did green land on the road side, because certainly where I live, I rarely see lush green grass.
 
I love the roo road sign image, its just a shame that it is so ginormous.  The kangaroo part is only the top part of the stamp, and as you can see it fills up my entire nail.  I had to use the bottom part of the stamp with the "Next 25km" on it, on my thumb.

Colours used are: 
  • Green - Paws Clover Green
  • Grey - FNUG Urban look
  • Yellow - OPI I can't cope-acabana


Friday, January 24, 2014

on 2 comments

Aussie Nails - Boomerang nail art

For today's Aussie nail art theme, here is a simple design I painted that basically just looked like abstract nail art. It was only when I line up my fingers just right that you can see I've painted a boomerang across four nails.

My base is Picture Polish Beige and the boomerang is Picture Polish Malt teaser. I then did some small black and white dot art on the boomerang.


I also stamped my thumb using Moyou Explorer 06 in black polish.


Here you can see the delicious blue summer sky and how the boomerang looked just like a bit of diagonal abstract nail art.


Thursday, January 23, 2014

on 5 comments

Aussie Nails: Australian Flag nail art

The classic Aussie flag mani.  They are everywhere this time of year down under, but I'm pleased to say I think these ones are my best ever.

Of course they are way too perfect for them to be free handed or stamped, again I used some Billy's Australiana Collection nail stickers, but this time they work awesome compared to the Koalas and Kangaroos yesterday.

I did three things different. 
  1. I used a base of nail polish instead of putting the sticker on my bare nail. I used Cult Nails Time Traveler for the perfect dark navy base.I think the base meant it didn't matter if I didn't get the positioning perfect.
  2. I used tweezers to place the stickers. Because of the fine tweezer touch, I didn't end up with my fingers sticking to the stickers whilst I was trying to apply them.
  3. I did a final top coat using Gelicious Ulta Glaze top coat gel polish. The gel top coat made them look glossy and perfect and also meant they lasted without any chips.
I loved these so much that I've continued to wear them on my right hand for the last three days (which of course meant I've had mismatching hands for a few days).  I have one last set of Billy's stickers in another flag design which I will be wearing on Australia Day, not necessarily to blog about, but because they look super awesome and make me feel dinky die mate, like a true blue Aussie shelia!


I also used on of the Billy's Australiana Collection rhinestone stickers of the Austrlaian Flag to bling up a spare clear iPhone case that I had. It made the perfect nail prop.


Have any other Aussies seen the Billy's Australiana Collection of stuff at their local dollar shop?


Wednesday, January 22, 2014

on 6 comments

Aussie Nails - Koalas and Kangaroos

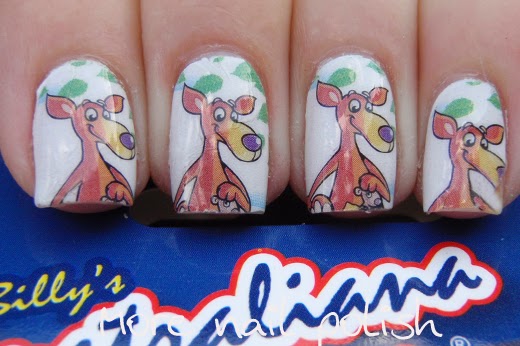
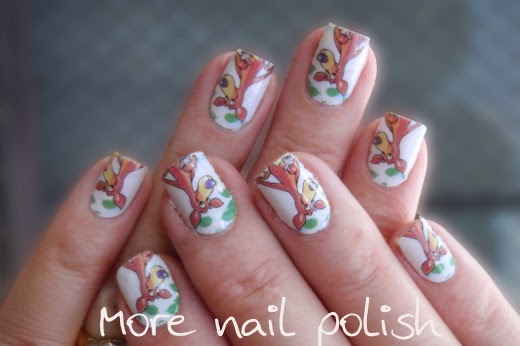
As a busy blogging, working mum, sometimes I need to cheat when it comes to quick nail art.  I couldn't go past these delightful nail stickers that I spied at my local dollar shop.  The brand is Billy's Australiana Collection, and there are heaps of different Australian Themed dohickies and dodads, such as temporary tattoos, sunglasses, earrings, flags, caps, rhinestone stickers and of course nail stickers.

These two designs feature cartoon designs of two of our most iconic animals, the Kangaroo and Koala. The designs are much longer than my nails, so I actually cut half of the animals off when filing the bottom part off.  You can just see the little joey on the bottom of my longer nails.


I actually found these nail sticker incredibly difficult to apply.  These are soooo thin and soooo stretchy! My main problem was because I would place these down onto a nail and find that I put it in the wrong place, I'd then try to reposition it like I can with other nail strips, but with these ones they streeetttcccchhh so much and then suddenly detach and coil up on themselves.  I even had trouble when I would place them on my nail in the right place and try to unstick the end of the strip from my finger that was holding it. Again it would be stuck to my other finger and just streeeettttcccchhh. 

Despite my difficulties, these still looked really cute on. They lasted nicely for a day each and were easily removed with polish remover.


Tuesday, January 21, 2014

on 6 comments

Aussie Nails - Swim between the flags

So Australia is one bloody big island right! That means we have a lot beaches and a huge beach culture.  One thing that is quintessentially Australian to me is the Australian Surf Lifesaver.  When we were kids and we went to the beach, it was drummed into us to make sure we swam between the flags.  My nail art today is a tribute to the Surf Lifesavers and those red and yellow flags.


This is the image that inspired the look. Photo Credit: BMD Northcliffe Sufe Life Saving Club.


I started with a white base and painted the bottom part of my nail using Contray Polish Sand.  I just had to use a polish called Sand to create the sand.  I then added a little bit of yellow polish at the tip to lighten the dry sand in the foreground. I used OPI I just can't cope-acabana.

I used Picture Polish Sky for the Sky, because again the polish name told me to.  For the ocean I used a fine nail art brush and painted on various blue areas.  The flags were painted free hand with OPI I just can't cope-acabana and Big Apple Red.  The surf board was done with IJCC and I printed a water decal with the Surf Rescue words on it so it was just perfect.


Monday, January 20, 2014

on 6 comments

Aussie Nails - Sydney Harbour Bridge nail art - take 2

We are one week out from Australia Day, and just like for the last two years, I've decided to have a full week of Australia themed nail art. From Aussie beers to prawns on the barbie, Uluru to the Harbour Bridge, patriotic flags and our beautiful rainbow cash - I've done them all (plus lots more) 

I've tried hard to come up with new ideas this year, with a huge exception for this first mani.  Last year I created one of my most popular designs using a print at home temporary tattoo to create the Sydney Harbour Bridge.  I wanted to revisit that mani and attempt the design using MoYou Tourist 09 Plate.  Using the stamp made it 1000 times easier to create this mani.

I created my blue gradient background using Picture Polish Sky, OPI No room for the blues and Ulta3 Blue Marlin.  The water beneath the bridge is Picture Polish Ocean and Cosmos. I free handed the Opera House onto my index finger and used the MoYou plate to stamp the rest of the Opera House onto my thumb.


I prefer the gradient I created this time, its much smoother and I love the overall cool blue finish to these nails.

Today's Aussie Nails Monday theme is "Australian", so there is going to be lots of Aussie nail around around today, and hopefully for the rest of the week.  If you blog, please share your Aussie themed mani in the inlinkz below.  If you are on Instagram please use the hashtag #ANausday so I can check them all out.


Sunday, January 19, 2014

on 4 comments

Emily de Molly - Path Less Taken and Maddy's Magenta

I have two gorgeous new holos from Emily de Molly to show you tonight.

Path less taken - a pale khaki green with a strong linear holo.  Application was flawless and it was perfectly opaque in two coats.


Maddy's Magenta - Wowee! Check this one out.  It's a bright and rich dark magenta with a strong linear holo flame.  Totally gorgeous.  Again this was two easy coats. I loved wearing this one, even though I wouldn't normally gravitate to this sort of colour.  The rich bright base just made me happy.


I also had a catch up with my local nail buddies today. We ate, we played with polish, we made a mess and we had a great time catching up.  I've only got a quick pick of four of our nails, instead of all five of us, as Julia (aka Messy Mansion stamping plates) was only part way through her mani.  I can't wait to try the technique she was working on as it involves three things I love, stamping, nail foils and stamping decals.


I loved that we all worked on our own totally different techniques today.  At the top, Kate @katersnails made a stunning mani using loose glitter, femo slices and leopard print. On the right, Sylvia @lilyandjinks worked on a really cool abstract green and gold mani using a tiny straw made from sticky tape. At the bottom, I worked on a free hand landscape mani for my upcoming Aussie themed nails week leading up to Australia Day. On the left, Hayley Emily de Molly used glitter polish and one of her Emily de Molly stamping plates to create stamped decals - and they were perfect!.  We were all such clever busy beavers.

About Me

My photo
I live in Canberra, Australia with my husband, Mr Ten and Miss Eight. My blog is all about nail polish, and a few other bits in between. You can contact me at morenailpolish@iinet.net.au