
I'm out at the baseball again tonight (they won last night - so only one more win!!!) but I have an epic scheduled post for you about Orly smartGELS.
I recently dipped my toes (and fingers) into at home gel nails using Australian brand Gelicious. I really love their product and commented a month or two back that I would love to try some other brands of cure at home gel polish. So when I was recently given the opportunity to review Orly's smartGELS system I jumped at the chance.

The package I received contained two of the new shades that Orly have just released as gel colours, an Orly LED lamp and the Orly smartGELS starter kit.

Let's start with looking at what's in the starter kit.
- Cleanser
- Remover
- Lint free wipes
- Primer
- Base + Top coat
- Cuticle oil
- Orly buffer file
- Orly cuticle remover and pusher tool
- Pack of 20 soak off satchels
- Instruction DVD
- Instruction guide brochure

I started by using Orly Cutique - which isn't in the pack but it's a staple part of my nail care routine. I painted it onto my nails and cuticles and let is soak for a short while.
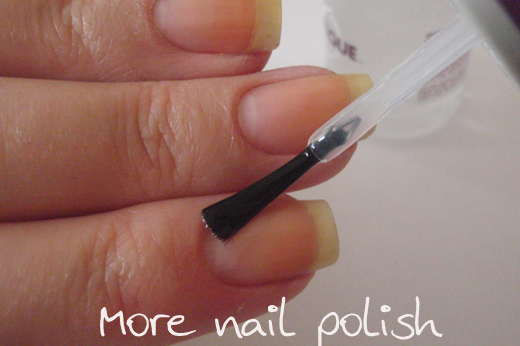
Here is the Orly pusher and remover tool - I have to say, this is the most awesomely amazing tool ever. I don't know how I ever cleaned my cuticles without this thing. It is quite sharp, so you have to be careful not to dig into your nail and cause damage, but if you use it gently it's sensational. The curved tip on the end is just the most perfect cuticle shape! It's so amazing I have already purchased another one of these tools for my mum. Seriously awesome tool. /rave.

Yep, here is me using the awesome tool!

Ok, next I used the cleanser and the lint free wipes from the starter pack to thoroughly cleanse each nail. I only cleansed the nails I was about to paint, not doing all 10 at once so I didn't risk getting oils back onto the nail.

The instructions say to lightly buff your nails, but I'm not a huge fan of buffing cause I tend to go overboard. So I skipped that step. Then the instructions say to apply the primer (from the starter pack) to just the tip of the nail. Done.

Here is the Orly LED lamp. It has only one button on the top to start it so it's pretty much idiot proof. It runs for an auto time of 60 seconds (with a beep at 30 seconds).

Next paint your nails with the base + top coat from the starter pack and cure under the lamp for 30 seconds. Then paint your desired polish colour on each nail and cure for 30 seconds for each coat. When you are happy with the appearance of the polish, apply a layer of base + top coat and cure.

Like with any gel manicure, you will end up with a stick residue on your nails. Grab the lint free wipe and use the cleanser to buff up the nail.

Finally, add a drop of the cuticle oil included in the starter pack to each nail and gently rub it in. It has a lovely fruity scent, maybe Papaya?

So that's how I put it on, shall we have a look at the two colours?
Crawford's Wine - a bright true red with a red shimmer. Really stunning in real life, and that's coming from someone who doesn't wear a lot of reds. I only needed two thin coats of get good opacity and a rich colour.


Shine - a bright silver foil. I have the regular version of this polish and it was one of the first Orly's I purchased. It's from the Foil FX collection and was partnered up with Luxe and Rage. I did find this one at lot sheerer than both the original version of Shine and Crawfords Wine. I ended up doing four thin coats to ensure I had full coverage. However I do find these gel polishes to be very thin, so even at four coats it's not thick and chunky at the tip of the nail.


Removal time - This was the part of was most interested in.
The instructions say to use the coarse side of the included file to file off the glossy top coat. Ok, done!

These are the soak off satchels that are included in the starter pack. They are small plastic bags with pieces of foam folded within them.

Looking down into one of the soak off pads.

I added a little squirt of the Orly remover...

... and shoved my nails in. I then enjoyed half a cup of coffee and read nail blogs on my ipad for 10 minutes.

After ten minutes I pulled off the soaker bags and all the polish just fell off in flakes. I didn't have to scratch or use the tool or anything.

Removal of Shine was so easy - but would the removal of Crawford's wine work just as well?
Top coat filed off? Check.

Soak, drink coffee, read blogs... polish falls off. Check!

Because I wanted to test out the wear on these polishes, I left my right hand wearing Crawford's Wine for six days. This photo was taken at the end of day six and it still looked fantastic. I only removed it because I had to put on my baseball themed nails yesterday.

Here are some of the things I loved about the Orly smartGELS
- The pusher and remover tool - enough said.
- The Orly smartGEL polishes only take 30 seconds to cure.
- The colours are the same ones that you purchase in the regular polish line. When I saw that Shine was amongst the colours I knew exactly what I was getting.
- The lamp has the auto timer so you don't have to sit watching the clock.
- The soak off gel remover baggies are very simple, yet very effective. Plus, you can reuse them over and over again. When I'm finished with them I just put them in a zip locked bag until next time.
- Removal in general was clean and easy.
- The lint free wipes. I usually just use cotton rounds I buy from Aldi, but they can get fluffy. I love these lint free wipes and a single one lasts for many manicures.
- The gel polishes are very thin. Even with multiple coats it doesn't end up looking thick at your free edge.
- Everything that is included in the Starter kit. It costs extra, but I love it!
Some things that I didn't love so much
- You have to file off the top coat. It just felt wrong using such a coarse grit file on the top of my nails. Even though I know I wasn't even close to my nail, it just felt... weird.
- The Orly smartGEL polishes are only small. 5.3ml to be exact. One thing I really love about the regular Orly line is their bottles are a huge 16ml. I wonder why they made these gels polishes so small.
- It's expensive to purchase everything at the start.The LED light is $99.95 RRP, the Starter Kit $79.95 RRP and each colour is $23.95.
There are eight new shades that will be available in March 2013:
- Catch The Bouquet (Barbie Pink withFuchsia Shimmer)
- Terracotta (Bright Pink Tangerine Crème)
- Shine (Metallic Silver Glitter)
- Passion Fruit (Hot Neon Pink)
- Crawford’s Wine (Deep Crimson with Cherry Shimmer)
- White Tips (White Crème)
- Ruby (Red Browne Crème)
- Liquid Vinyl (Black Crème)
Product provided for review.


did your nails look smooth and undamaged after use? I recently used some color riche nail art stickers, but after peeling them off the top layer of my nails lookedand felt uneven and damaged. Shine is one of my favorite orly shades :)
ReplyDeleteYes, after the 10 minute soak removal my nails were clean, smooth and undamaged, I didn't have to scratch it off at all.
DeleteHonestly, it's a LOT of work (both application and removal) for a mediocre result, I always see the thin strip of your naked nailtips, looks like you have worn nailpolish from the first day :/
ReplyDeletePlus, I don't understand why wear the same colour for 2-3 weeks: just after six days, growth is so visible, I can't imagine after 15-20 days!
Who wants to wear colour starting from the middle of the nails? :D
It's definitely more work than a usual mani, but I don't think the result is mediocre. Getting a full week of wear out of a polish, without chips and only a little regrowth showing is perfect for people who want manicured nails but can only do then once a week.
DeleteI do agree with the tip wear showing on some shades though, generally with darker ones. But I thought it was more because I wasn't wrapping my tips very well rather than too much shrinkage.
Waaaaay too much trouble for me, but it looks good :/
ReplyDeleteI don't understand how gel polish is too much trouble? If you're doing a base, coats plus topcoat the only difference is drying in a light for 30 to 60 seconds. After you're done your nails are 100% dry so there's no tiptoeing around what you could be doing, or waiting to go to bed bc of the dreaded sheet prints. Anyway!
ReplyDeleteThought I would mention that 1) $99 is a ripoff! You can get that lamp for $30 or less on Amazon or EBay. Many other systems use that same one, like Sensationail. And 2) if you have insanely bad luck with nail polish wear like me from extremely thin and bendy nails, you might consider using one of these kits to do just base and topcoat as an overlay to paint normal polish over. You can change colors with non acetone remover and my polish stays on other than tip wear for a week or more!
I 100% agree Brittany, especially about the drying time, strength for weak nails and wearing other colours on top. The prices above are Australian RRP, and things are always much more expensive here in Australia, but I'm sure there are cheaper deals online.
DeleteI just received this pack, I must review it soon but it's the dreaded feeling of only wearing 1 polish for at least a week that i'm not keen on so i've been delaying it! It's funny how you liked that cuticle pusher! I found it too harsh and it would scratch some nail off!! haha but I love the colours you chose and it's lasted such a long time!
ReplyDeleteI know exactly what you mean about wearing one polish for a whole week! Luckily I was on leave from work this week so I was able to keep the gel colour on my right hand and still swatch etc on my left, without looking too weird with nails of different colours.
DeleteFunny you don't like the tool, I found it just glided over the top of my nail and only took off the dry skin bits after applying cutique.
Great review! It must have taken longer to do that than to do the manicure.
ReplyDeleteI love Gels! I aim to redo them once a week but that often extends to two weeks. Does that mean I'm stuck with one mani for all that time? No way!! I apply my favourite colours as needed and remove with non-acetone remover which leaves the gels perfect for the next colour or finish. No tip wear to show or regrowth as the gels are so much finer than salon manicures.
LOL Yes, it took three times longer to edit and write this up than to do the mani.
DeleteGreat to see you loving gels and use them just like I do.
Great, informative post. You are so thorough!
ReplyDeleteThank you!
DeleteHi, Just wondering how your mums peeling nails go with the cure at home gels? I have really bad peeling nails so am nervous to try them. Thanks for the great in depth review.
ReplyDeleteHey Cakesby - I just emailed her and asked her exactly this. Here is her reply:
Delete"For 50 years I wanted the nails I now have! As they started to grow under the protection of the Gelicious the original flakiness has grown out and I have the novelty now of having to file my nails shorter so they don’t end up looking too long!!! Because my nails will always be thin (just like some people have naturally thick strong nails), I would never go even an hour without my Gelicious nails."
So I'm thinking the gel nails are going good for her, and the peeling nails are certainly better (if not gone).
Hey There!
ReplyDeleteGreat review! I'm probably going to give these a try at some point - especially since you say they come off so easy - I've had some issues with my Gelish. I just wanted to give you a heads up on two things. You said you started out with Orly Cutique - you may want to skip that step if you ever plan to wear the gels for longer than a day or two. Gels will seal in any residual oil left on your nail and that can cause issues (with gels in a salon is always recommended to not even doing a manicure with water - just a dry manicure). The second is that the reason for buffing the nail is only to remove the shine. Gels are known to not stick to shine. So for long term wear it would be a bad step to skip. Hope that helps! I've gone to a couple of Gel Polish professional classes, so i thought i'd share the wealth of knowledge. You did an amazing job! They look smooth, flawless, and very very pretty!
Thanks Diva - they are both excellent tips. I'm definitely only a noob at doing home gels so your information is very helpful!
DeleteAll great tips and advice well explained :)
ReplyDeleteReally great tips!
ReplyDeleteBut I'm wondering if anybody tried sandwiching with smartgels: using just a smartgel base coat + regular nail polish + smartgel top coat. Or just regular base coat + regular polish + smartgel top coat.
I've read that's cheaper and a great way to expand a color range.
this does look like a lot of work.. but I think the polishes you wore look gorgeous.
ReplyDeleteI use Shellac and they are NOT a lot of work. I used to do my nails with regular polish twice a week and I'd get 2 or 3 days before they chipped. Much of the time I'd knock a nail before it was dry and kill my mani. With shellac/soak off gels I spend less time (no drying) getting a better result for much longer. If you get bored with the colour add a glitter top coat. Or some nail art.
ReplyDelete