
If you’re a regular blog reader, I’m sure you would have
already seen a bunch of great nail blog posts sharing tutorials and tips
for nail art on a budget.
There are a lot of nail art techniques that we all use quite often, such as home made dotting tools, using
scotch or masking tape, cutting tape with shaped cutting craft scissors, hole
reinforcing stickers, saran wrap, makeup sponges for gradients etc. These are all are awesome money smart ideas, but generally, they are all
ones we are pretty familiar with and use all the time.
As my entry for the Money Smart Nail Art competition, I
thought I would challenge myself to come up with some new nail art ideas. Specifically, ones that don’t require you to
purchase anything and can be created with items you are likely to have around
the house.

Create your own magnet designs for magnetic nail polish.
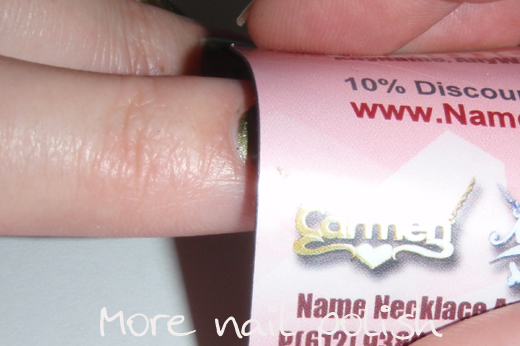
First up is how to create new nail designs for your magnetic nail polishes. The easiest design is to simply create lines using a regular flat fridge magnet. These are the sort of fridge magnets that you usually get for free in the post with advertising material. They are perfect for curved nails because you can bend them and wrap them around your nails.
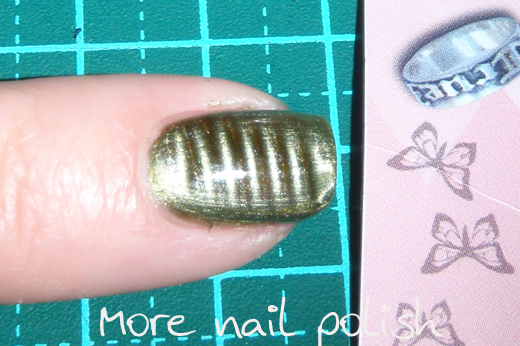
I created a new triangular design by cutting up the magnet and putting the pieces together in a different layout.

First, the most important thing to work out is the polarization on the magnet you are going to use. The easiest way to do this is to paint your magnetic polish on the front of the magnet and see what design forms. As you can see on this magnet, there was a section where the lines were malformed. Avoid those areas otherwise you wont end up with a design that looks like you want it to.

Next you just grab your scissors and cut up the magnet into various shapes and them place them back together into the new shape. The design I created today involved cutting up the magnet into three large wide triangles where the polarization went across the triangle horizontally. The below drawing shows how the lines on the magnet are lined up and my actual finished magnet. I just hold it together with double sided sticky tape and then stick it to some soft card. That way I can still curl it around my curved nails.


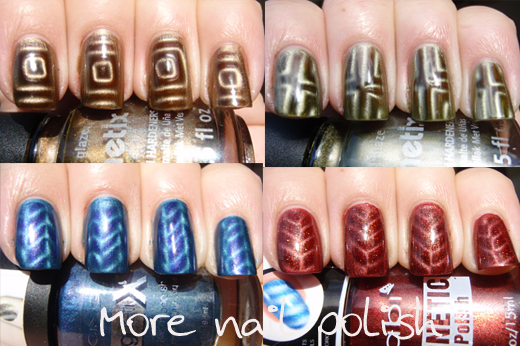
In case you never saw them before, below are another eight designs you can create by making your own magnetic polish magnets at home. I wont go into details here, because this post is long enough already, but both these blog posts provide a full tutorial on how to do this again.

Creating full nail designs using printed napkins
This next design is one I created using some printed paper napkins. Ideally, you want a design that has small images on them so you can see what they are, this one is a little big, but it's what we already had at home.

To create this look:
- Cut out some of the paper napkin in the shape of your nail.
- Separate the sheets of the napkin. Usually napkins are double ply, so you only want to use the printed sheet.
- Paint your nail a base colour and let it dry.
- Paint a second coat of the colour and stick the paper napkin to your nail.
- Gently file off the excess at the tip of your nail
- Cover your designs in top coat.
You will find that the top coat soaks into the paper, and you will need to use about 3 layers of top coat to have a glassy finish.


Creating full nail designs using printed tissue paper.
This is some printed tissue paper we had at home. I can't even tell you where we got it. I may have been part of a gift wrapping. But I can tell you it has a beautiful intricate design on it that would translate to nail art easily.

The idea with tissue paper is basically the same as with the napkin design.

- Cut out some of the tissue paper in the shape of your nail - Tip: use false nails the right size as your real nails as a template to cut around.
- Paint your nail a base colour and let it dry.
- Paint a second coat of the colour and stick the paper napkin to your nail.
- Gently file off the excess at the tip of your nail
- Cover your designs in top coat.
Tip: use a stiff bristled brush to dab fast drying top coat into the tissue paper on your nails, like you are doing paper mache or decoupage. Then the final coat of top coat wont soak in too much and will remain glossy.


As far as wear, I found both the napkin and tissue paper
designs stayed on my nails far better than nail foils or stickers. They
didn't lift of peel in the 24 hours I wore them.
Tip: check your tissue paper and napkins for colour fastness before using them, by putting a few drops of nail polish remover on them. Both the design I used above were completely colour fast and didn't bleed color at all - I don't know if I was just lucky of if this is a normal thing.
Creating caviar nail designs using poppy seeds.
OK, we are stepping right out of the box here, and to be honest I really didn't think this was going to work. However I was so shocked by how effective this looked.
Rather then spending money purchasing micro beads to create a caviar look on your nails, why not see what seeds you have in your pantry cupboard.

I painted my nails using Picture Polish Starry Night and then put a thick layer of top coat on the middle two nails and dipped each nail into the waiting pile of poppy seeds. These first two photos are without top coat. What I particularly like is the natural colour variance of the poppy seeds, it made the effect more interesting.


These next two photos show the poppy seeds with top coat. Those little suckers aren't coming off now!


Create your own textured polish by adding sand
The latest nail craze right now is textured polishes, liquid sand, concrete effect or whatever you want to call it. I know you've all been thinking it - "those polishes just look like someone added sand", so I thought what the hell, lets try this out. Here is my final creation.

What you will need is:
- fine grade sand - I honestly went outside to the plastic clam shell sand pit and grabbed a finger full of sand.
- fine strainer - I used a tea strainer.
- polish of your choice - I mixed some clear polish with a dark blue.
Step 1 - Wash and strain your sand to ensure it's clean and fine.
Step 2 - Add the sand to your bottle of polish - Tip: use an old empty bottle and decant some polish into it, just in case things don't go so well you have ruined a whole bottle of polish.
Step 3 - Shake and check your polish on a piece of paper, add more sand if required.
Step 4 - Optional - add a little glitter if you want your textured polish to sparkle. I added a little scoop of micro fine .004" hex blue glitter.

The final result was certainly textured, but not too rough. It was a very similar to feel to the OPI Mariah Carey polishes. If you used a matte polish as your base, it would create an effect even more similar.


Using pressed flowers, petals and leaves
Here is a page of pressed petals, flowers and clover that I put into a thick book just yesterday. It was slim pickings in our backyard at the moment. Its the beginning of Autumn and there really isn't much left flowering.

This first design was created using a single petal as an accent nail. This petal was the one that was at the centre at the top of the photo above, so you can see that when top coat is applied, the colour does fade and yellow, but the effect of the petal veins is still very pretty. Tip: use tweezers to handle the pressed flowers, they are very thin and delicate.

The last design I leave you with today is probably my favourite of the bunch, and one that is the most timely with St Patricks day coming up in a couple of weeks. I painted my two centre nails using Picture Polish Beige and the outside nails using a green franken I made using chromium green pigment from TKB trading.
I used tweezers to carefully place the pressed clovers onto each nail into slightly tacky top coat. Two layers of top coat smoothed them out perfectly.


I hope you enjoyed my Money Smart Nail Art tips and tutorials and I'd love to hear if you try any of these.


Amazing post, so many awesome ideas. I love the pressed flower nails and also the liquid sand DIY! I didn't think it would work but it looks great! Just like the real thing!
ReplyDeleteThis is one awesome post! Will be trying out your DIY money smart mani soon. Thanks for sharing your genius ideas.
ReplyDeleteThe tissue paper looks really good! Great idea :) The petals and clovers are also cute
ReplyDeleteYou are basically the Martha Stewart of nail art, and I mean that in the best possible way.
ReplyDeleteReally good ideas. I guess a lot of us don't realise that many things around us can be used for nail art as well. My favourite out of the ideas is the dried flowers and your st patricks day nails.
ReplyDeleteOmg, the tissue paper method and using pressed flowers blew my mind, this post is a winner in my books! Now I'm just going to drool over the clover mani for a little longer ^__^
ReplyDeleteWow - so many interesting ideas!
ReplyDeleteCathy, you are amazing!!!! I hope you know that! These ideas are utterly brilliant, definitely going to have to try them.
ReplyDeleteWhat an incredible post!!! Absolutely awesome ideas!
ReplyDeletethese are all very bright and innovative ideas. I know I'll be returning to this post for inspiration! TY so much!
ReplyDeleteOMG!! I'm SO excited to try out the napkin and tissue paper nails! I always drool over nail strips and their intricate & colorful designs but never buy them due to my curvy nail beds (puckering on the sides makes me INSANE!), this looks like a much better option that might actually work! Thanks for the tips! :)
ReplyDeleteThese ideas are mind-blowing!:D
ReplyDeleteSome interesting ideas here - I have actually wondered if sand in nail polish would create textured polish, glad you tried it out :)
ReplyDeleteBrilliant!
ReplyDeleteLove the clover ☼
ReplyDeleteThis post is amazing! It's crazy how many things we have around the house that can be used for nail art. Thank you for sharing!!! :D
ReplyDeleteI would so love to do the clovers for St Patty's Day, but our grass is hidden under 3-4 feet of snow atm, so I guess I'll have to save some this summer for next year. :-)
I have to try the clover one, great idea. Plus St. Patrick's Day is big in my home since its also my son's birthday
ReplyDeleteBrilliant post!
ReplyDeleteI love all these ideas, but first of all I'm going to mix up a bit of my Manglaze Lesbihonest with some sand - what I've been missing with all the textured polishes released recently is a hot pink! Thanks so much for this tip!
I. LOVE. The Clovers. *_*
ReplyDeleteI'm gonna press a LOT of stuff when it's green outside again! (can't find many clovers under all this snow...)
I really liked your ideas, and actually, I think the poppy seed manicure looks better than regular caviar manicure, which I am not overly fond of. I also really like how you created your own textured polish. I might try that...
ReplyDeleteThis is a wonderful post and I simply love it! I have been sharing it on my Facebook and I added you on my blog roll too... I always read you but not leaving comments... xoxo! Bibulle (french ^^)
ReplyDeleteloved all those pressed flower mani's and i am so going to have to steal the clover one for st paddy's day!
ReplyDeleteBrilliant! I think the DIY magnets alone should win, but with the sand and the napkin/tissue paper... you definitely will win the contest :)
ReplyDeleteWho needs the same ol' designs that come with their magnet polish? Or Liquid Sand/Pixiedust? Or nail strips? My wallet is thanking you!
Ok this may have been the most informative nail art post I've seen in forever! Thank you!!!
ReplyDeleteFlowers!!! Amazing :)
ReplyDeletewow. seriously....so many fantastic ideas that actually look good, too! the poppy seeds and clovers were by far my favorite, this was a fantastic post I will be bookmarking to view repeatedly!
ReplyDeleteThis is an amazing post, I'll definitely be trying some of these techniques!
ReplyDeleteWOW! I love how the sand mani looks! these are all great ideas....the flower petal and the polish colour you choose is very pretty.
ReplyDeleteAbsolutely amazing ideas you've got here! Really well done! My favourite has to be the clover leaf one! Simple yet beautiful!
ReplyDeleteBest post ever!!!
ReplyDeleteI do decoupage... I have more than 300 diferente napkins and never used them in my nails! until now...;)*
Oh my gooooooddd. SO creative!! Thank you for this post!
ReplyDeleteThis sounds fab but do you have any tips on removing these tough designs after? I really struggle just to get glitter nailpolish off!
ReplyDeleteThis is an amazing post!! I can't wait to try these :)
ReplyDeleteDoes the sand settle in the bottle after a little while?
ReplyDeleteWow what a fantastic post!! I am definitely going to try the tissue paper one! I can't wait :D ! Fab xx
ReplyDeleteThank you so much for this post!
ReplyDeleteLove all the ideas can't wait to try them all.Was wondering how long do they usually last?
ReplyDeleteAbsolutely awesome. What an amazing collection of money-saving nail art designs. Thank you so much for sharing all these with us. I'm certainly going to be trying most of them.
ReplyDelete